Brother International SE600 Operation Manual - Page 64
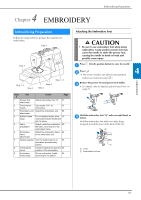
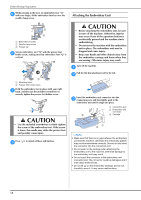
Attaching the Embroidery Frame
 |
View all Brother International SE600 manuals
Add to My Manuals
Save this manual to your list of manuals |
Page 64 highlights
Embroidering Preparation Attaching the Embroidery Frame Note • Wind and insert the bobbin before attaching the embroidery frame making sure to use the recommended bobbin thread. Check that there is enough thread in the bobbin. Raise the presser foot lever to raise the presser foot. a Pass the embroidery frame under the presser foot. b • If necessary, raise the presser foot lever even further. ■ Removing the embroidery frame Raise the presser foot lever to raise the presser foot. a Press the part of the embroidery frame holder in the b figure to the left side, and raise the embroidery frame. 1 Lever a → The embroidery frame will separate from the embroidery frame holder. Remove the embroidery frame under the presser foot c while raising the presser foot lever even further. Firmly insert the embroidery frame guide into the c embroidery carriage frame holder from the top. Line up the embroidery frame guide tabs and the embroidery carriage frame holder slots and push in until it clicks and stops. a b CAUTION • Do not hit the needle with your finger or the embroidery frame. It may cause injury or needle breakage. 1 Embroidery frame guide tabs 2 Embroidery carriage frame holder slots → The embroidery unit is attached. CAUTION • Correctly set the embroidery frame into the embroidery frame holder. Otherwise, the presser foot may hit the embroidery frame, resulting in injury. 62
-
 1
1 -
2
-
3
-
4
-
5
-
6
-
7
-
8
-
9
-
10
-
11
-
12
-
13
-
14
-
15
-
16
-
17
-
18
-
19
-
20
-
21
-
22
-
23
-
24
-
25
-
26
-
27
-
28
-
29
-
30
-
31
-
32
-
33
-
34
-
35
-
36
-
37
-
38
-
39
-
40
-
41
-
42
-
43
-
44
-
45
-
46
-
47
-
48
-
49
-
50
-
51
-
52
-
53
-
54
-
55
-
56
-
57
-
58
-
 59
59 -
 60
60 -
 61
61 -
 62
62 -
 63
63 -
 64
64 -
 65
65 -
 66
66 -
 67
67 -
 68
68 -
 69
69 -
70
-
71
-
72
-
73
-
74
-
75
-
76
-
77
-
78
-
79
-
80
-
81
-
82
-
83
-
84
-
85
-
86
-
87
-
88
-
89
-
90
-
91
-
92
-
93
-
94
-
95
-
96
-
97
-
98
-
99
-
100
 |
 |
