Brother International XL-6452 User Manual - French - Page 10
Principal, Parts
 |
View all Brother International XL-6452 manuals
Add to My Manuals
Save this manual to your list of manuals |
Page 10 highlights
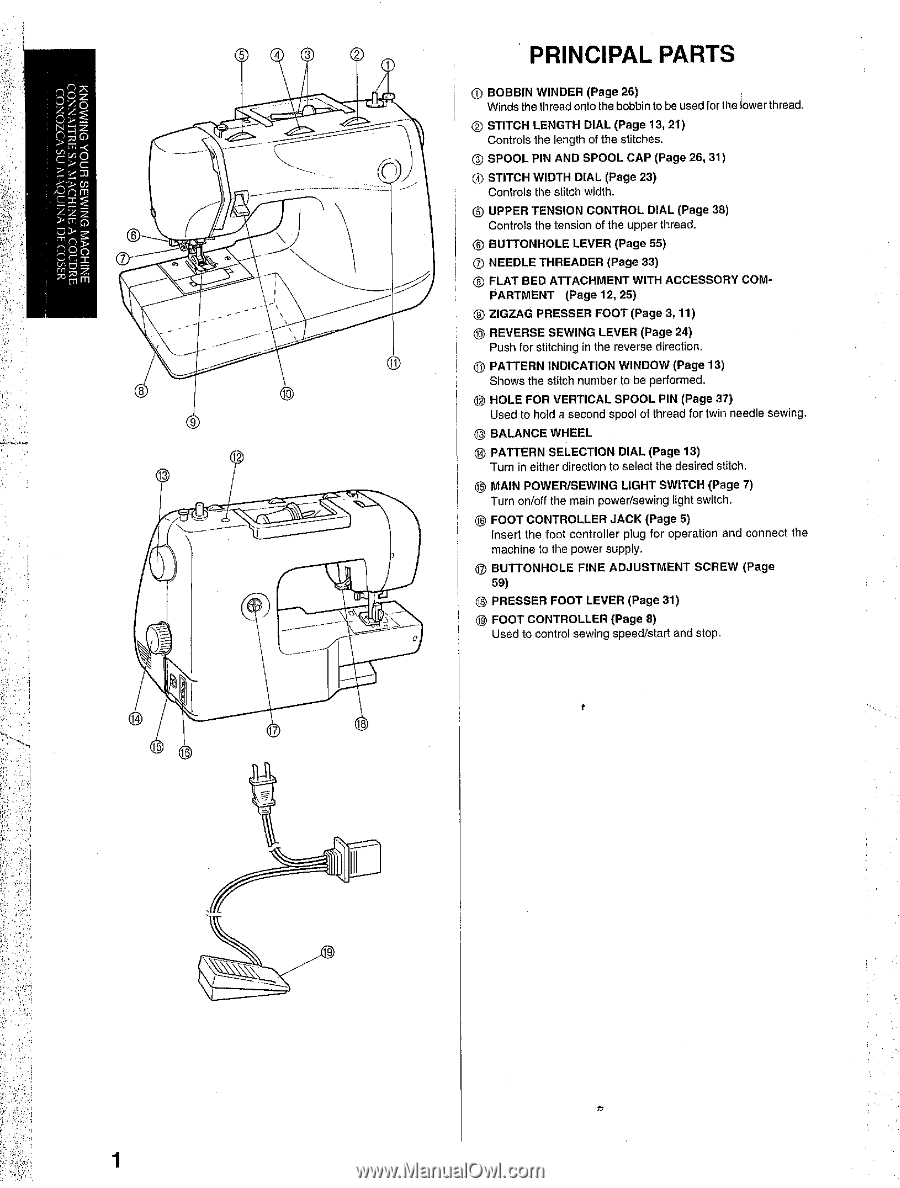
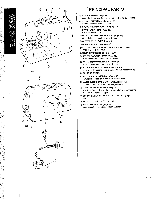
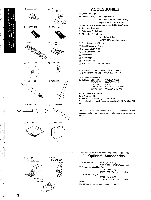
n zi p >r, O_< - -Y1)O - c to Cnm Y > > 0 z m 5 4 3 2 I I 8 9 PRINCIPAL PARTS (D BOBBIN WINDER (Page 26) Winds the thread onto the bobbin to be used for the lower thread. 0 STITCH LENGTH DIAL (Page 13, 21) Controls the length of the stitches. C) SPOOL PIN AND SPOOL CAP (Page 26, 31) (1) STITCH WIDTH DIAL (Page 23) Controls the stitch width. C) UPPER TENSION CONTROL DIAL (Page 38) Controls the tension of the upper thread. C) BUTTONHOLE LEVER (Page 55) 0 NEEDLE THREADER (Page 33) () FLAT BED ATTACHMENT WITH ACCESSORY COM- PARTMENT (Page 12, 25) 0 ZIGZAG PRESSER FOOT (Page 3, 11) () REVERSE SEWING LEVER (Page 24) Push for stitching in the reverse direction. C) PATTERN INDICATION WINDOW (Page 13) Shows the stitch number to be performed. 0 HOLE FOR VERTICAL SPOOL PIN (Page 37) Used to hold a second spool of thread for twin needle sewing. 0 BALANCE WHEEL 8 PATTERN SELECTION DIAL (Page 13) Turn in either direction to select the desired stitch. MAIN POWER/SEWING LIGHT SWITCH (Page 7) Turn on/off the main power/sewing light switch. FOOT CONTROLLER JACK (Page 5) Insert the foot controller plug for operation and connect the machine to the power supply. BUTTONHOLE FINE ADJUSTMENT SCREW (Page 59) PRESSER FOOT LEVER (Page 31) 0 FOOT CONTROLLER (Page 8) Used to control sewing speed/start and stop. 0 (3) © 1
-
 1
1 -
2
-
3
-
4
-
 5
5 -
 6
6 -
 7
7 -
 8
8 -
 9
9 -
 10
10 -
 11
11 -
 12
12 -
 13
13 -
 14
14 -
 15
15 -
16
-
17
-
18
-
19
-
20
-
21
-
22
-
23
-
24
-
25
-
26
-
27
-
28
-
29
-
30
-
31
-
32
-
33
-
34
-
35
-
36
-
37
-
38
-
39
-
40
-
41
-
42
-
43
-
44
-
45
-
46
-
47
-
48
-
49
-
50
-
51
-
52
-
53
-
54
-
55
-
56
-
57
-
58
-
59
-
60
-
61
-
62
-
63
-
64
-
65
-
66
-
67
-
68
-
69
-
70
-
71
-
72
-
73
-
74
-
75
-
76
-
77
-
78
-
79
-
80
-
81
-
82
-
83
-
84
-
85
-
86
-
87
-
88
-
89
-
90
-
91
-
92
-
93
-
94
-
95
-
96
-
97
-
98
 |
 |