Brother International XL-6452 User Manual - French - Page 51

Straight, Stitching, Puntadas, rectas

Page 51 highlights

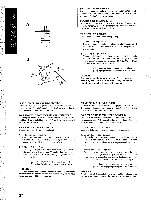
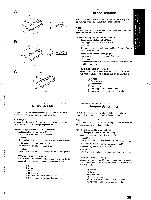
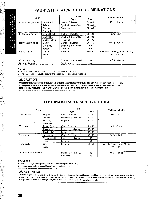
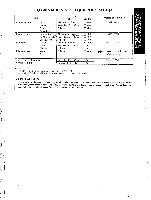
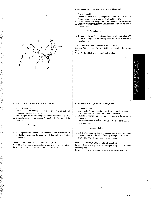
Straight Stitching Pattern i (Straight Stitch) (Triple Stretch Stitch) Stitch Length 1-4 l= Stitch Width 5 STARTING SEWING 1. Turn the Pattern SelectionDial to show your desired stitch in the Pattern Indication Window. Setting the Pattern Selection Dial to Straight Stitch or Triple Stretch Stitch is required. 2. Raise the needle to its highest position and lift the presser foot lever. 3. Pull the upper thread toward the back of the presser foot. 4. Place the fabric under the presser foot and position the needle 1 cm (3/8") from the edge of the fabric. 5. Lower the presser foot. 6. To backtack, push down the Reverse Sewing Lever as tar as possible, then step down on the toot controller to start reverse sewing. 7. Release the Reverse Sewing Lever and start sewing in the forward direction by applying pressure to the foot controller. o c, '(N..)Ou‹ NtN * Reverse sewing Is used for locking the end of seams and where reinforcement Is needed. A CAUTION Be sure the needle does not strike a basting pin, or any other objects, during sewing. The thread could tangle or the needle could break, causing injury. cD,„ NWy z.p.cao-x

  • 1
  • 2
  • 3
  • 4
  • 5
  • 6
  • 7
  • 8
  • 9
  • 10
  • 11
  • 12
  • 13
  • 14
  • 15
  • 16
  • 17
  • 18
  • 19
  • 20
  • 21
  • 22
  • 23
  • 24
  • 25
  • 26
  • 27
  • 28
  • 29
  • 30
  • 31
  • 32
  • 33
  • 34
  • 35
  • 36
  • 37
  • 38
  • 39
  • 40
  • 41
  • 42
  • 43
  • 44
  • 45
  • 46
  • 47
  • 48
  • 49
  • 50
  • 51
  • 52
  • 53
  • 54
  • 55
  • 56
  • 57
  • 58
  • 59
  • 60
  • 61
  • 62
  • 63
  • 64
  • 65
  • 66
  • 67
  • 68
  • 69
  • 70
  • 71
  • 72
  • 73
  • 74
  • 75
  • 76
  • 77
  • 78
  • 79
  • 80
  • 81
  • 82
  • 83
  • 84
  • 85
  • 86
  • 87
  • 88
  • 89
  • 90
  • 91
  • 92
  • 93
  • 94
  • 95
  • 96
  • 97
  • 98

Straight
Stitching
Pattern
Stitch
Length
Stitch
Width
i
(Straight
Stitch)
1-4
5
(Triple
Stretch
Stitch)
l=
Point
droit
Modele
de
point
Longueur
de
point
Largcur
de
paint
I
(Point
droll)
I-4
5
III
(Point
triple)
M
POI
I
R
COMMENCER
A
COUDRE
I.
'
'owner
ie
sdlecteur
de
modelc
de
point
pour
qua
Ic
point
souhaitd
'affiche
dans
la
fenetre
d'indication.
Meitre
le
selecteur
sur
Ic
point
Iroit
on
Ic
triple
point
dlastique
scion
Its
besoins.
2.
I:eitionicr
complacinent
l'
alga
ille
et
rclever
Ic
levier
du
pied
-de
-
I
'idle.
3.
"irer
Ic
fit
supdricur
vers
Pnrriere
du
pied-dc-biche.
4,
'lacer
Ic
tissu
sous
Ic
pied-de-bicheci
Imlay
Paiguille
ii
1
eon
du
bard
slit
liSgll.
5.
.
Mils:ter
lc
pied
-de
-hick.
6.
l'our
coudre
en
marelie
arriere,
appuyer
an
maximum
sur
le
levier
de
(mime
airier°,
pais
appuyer
stir
la
pddalc
pour
commencer
h
coudre.
7.
I:elhcher
le
levier
de
couture
en
marche
arriere
etcommencerh
coudre
avant
cn
appuyant
sur
la
pddalc.
I
.a
couture
cn
marelte
arriere
sort
I
arrater
ou
A
ream=
Its
matures.
A.
ATTENTION
Pt
ndant
In
couture,
veillez
a
ce
que
ne
touciw
pas
une
cp
Ingle
Mack
pour
maintenir
le
tissu
on
tout
autre
objet.
Le
III
ri..querait
de
s'emmelcr
ou
l'aigullle
pourrait
CASSer
et
vous
hl
•sser.
STARTING
SEWING
1.
Turn
the
Pattern
Selection
Dial
to
show
your
desired
stitch
in
the
Pattern
Indication
Window.
Setting
the
Pattern
Selection
Dial
to
Straight
Stitch
or
Triple
Stretch
Stitch
is
required.
2.
Raise
the
needle
to
its
highest
position
and
lift
the
presser
foot
lever.
3.
Pull
the
upper
thread
toward
the
back
of
the
presser
foot.
4.
Place
the
fabric
under
the
presser
foot
and
position
the
needle
1
cm
(3/8")
from
the
edge
of
the
fabric.
5.
Lower
the
presser
foot.
6.
To
backtack,
push
down
the
Reverse
Sewing
Lever
as
tar
as
possible,
then
step
down
on
the
toot
controller
to
start
reverse
sewing.
7.
Release
the
Reverse
Sewing
Lever
and
start
sewing
in
the
forward
direction
by
applying
pressure
to
the
foot
controller.
*
Reverse
sewing
Is
used
for
locking
the
end
of
seams
and
where
reinforcement
Is
needed.
A
CAUTION
Be
sure
the
needle
does
not
strike
a
basting
pin,
or
any
other
objects,
during
sewing.
The
thread
could
tangle
or
the
needle
could
break,
causing
injury.
Puntadas
rectas
Modelo
de
puntada
Largo
de
puntada
Ancho
de
puntada
i
(puntada
recta)
1-4
5
f
1
(Triple
puntada
pespunto)
Ell
PARA
EMPEZAR
A
COSER
1.
Gire
el
selector
de
puntada
hasta
que
la
puntada
que
desea
aparezca
en
el
indicador
de
puntada.
Es
necesario
situar
el
selector
de
puntada
en
puntada
recta
pen
triple
puntada
pespunte.
2.
Leva
me
la
aguja
a
so
position
nvis
alta
y
levante
la
palanca
del
prensa
lel
as.
3.
Tire
el
bib
superior
hacia
la
panic
de
atras
del
prensatelas.
4.
Coloque
el
tejido
rlebajo
del
prensatelas
y
posicione
la
aguja
a
1
cm
(3/6")
de
la
wills
del
tejido.
.5.
naje
el
prensatelas.
6.
I'ara
retroceder,
baje
a
Tondo
el
pulsador
de
retroceso,
luego
presione
et
pedal
pare
empezar
a
coser
hacia
atr6s.
7.
Suelte
el
pulsador
de
retroceso
y
ernpiece
a
coser
hacia
delante
presionando
el
pedal.
*
Et
cosido
hacia
a
Ms
se
utiliza
para
rematar
el
final
de
costuras
y
cuanclo
es
nomad()
reforzar.
A
PRECAUCION
Asegurese
de
que
la
aguja
no
roza
el
Alter
o
cualquier
otro
objelo.
El
hilt)
podrfa
enroilarse
o
la
aguja
podrfa
romperse
y
causar
lesiones.
o
c
,
'N
u
(..)O‹
NtN
cD
,„
NWy
pax
z—.
FZ
..c
o<
O
LC
0-
i-
tn
42