Canon 9353A004 elan7n_instructions.pdf - Page 32
Using Red-eye Reduction
 |
UPC - 077701521646
View all Canon 9353A004 manuals
Add to My Manuals
Save this manual to your list of manuals |
Page 32 highlights
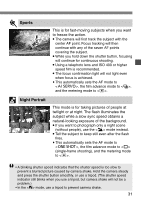
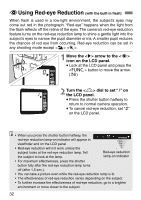
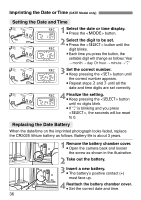
FUsing Red-eye Reduction (with the built-in flash) When flash is used in a low-light environment, the subject's eyes may come out red in the photograph. "Red eye" happens when the light from the flash reflects off the retina of the eyes. The camera's red-eye reduction feature turns on the red-eye reduction lamp to shine a gentle light into the subject's eyes to narrow the pupil diameter or iris. A smaller pupil reduces the chances of red eye from occurring. Red-eye reduction can be set in any shooting mode except . 1 Move the arrow to the icon on the LCD panel. • Look at the LCD panel and press the button to move the arrow. (1) 2 Turn the dial to set "E" on the LCD panel. • Press the shutter button halfway to return to normal camera operation. • To cancel red-eye reduction, set "W" on the LCD panel. • When you press the shutter button halfway, the red-eye reduction lamp-on indicator will appear in viewfinder and on the LCD panel. • Red-eye reduction will not work unless the subject looks at the red-eye reduction lamp. Tell the subject to look at the lamp. Red-eye reduction lamp-on indicator • For maximum effectiveness, press the shutter button fully after the red-eye reduction lamp turns off (after 1.5 sec.). • You can take a picture even while the red-eye reduction lamp is lit. • The effectiveness of red-eye reduction varies depending on the subject. • To further increase the effectiveness of red-eye reduction, go to a brighter environment or move closer to the subject. 32
-
 1
1 -
2
-
3
-
4
-
5
-
6
-
7
-
8
-
9
-
10
-
11
-
12
-
13
-
14
-
15
-
16
-
17
-
18
-
19
-
20
-
21
-
22
-
23
-
24
-
25
-
26
-
 27
27 -
 28
28 -
 29
29 -
 30
30 -
 31
31 -
 32
32 -
 33
33 -
 34
34 -
 35
35 -
 36
36 -
 37
37 -
38
-
39
-
40
-
41
-
42
-
43
-
44
-
45
-
46
-
47
-
48
-
49
-
50
-
51
-
52
-
53
-
54
-
55
-
56
-
57
-
58
-
59
-
60
-
61
-
62
-
63
-
64
-
65
-
66
-
67
-
68
-
69
-
70
-
71
-
72
-
73
-
74
-
75
-
76
-
77
-
78
-
79
-
80
-
81
-
82
-
83
-
84
-
85
-
86
-
87
-
88
-
89
-
90
-
91
-
92
-
93
-
94
-
95
-
96
-
97
-
98
-
99
-
100
 |
 |
