Canon DP-V1711 Video Display Operation Guide - Page 11
Export/Import, LUT Import
 |
View all Canon DP-V1711 manuals
Add to My Manuals
Save this manual to your list of manuals |
Page 11 highlights
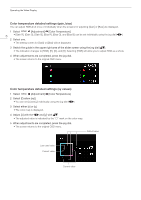
Operating the Video Display Note • Perform matrix calibration of the display color analyzer prior to calibration. If calibration is performed without performing matrix calibration, an error may occur. Refer to the CA-310 and CA-210 instruction manual for the detail operation. • Warming-up is necessary to stabilize the brightness of the video display. Wait at least 10 minutes after turning on the power before 11 performing calibration. • Perform calibration in a dark room so that no external light enters the sensor. If external light enters the sensor, low brightness characteristics cannot be calibrated correctly. • Due to the characteristic of LCD panel and individual difference of CA-310 and CA-210, the calibration results may differ. Export/Import You can export/import LUT and CDL parameters as well as main menu settings. LUT Import ( 35) 1 Insert the USB memory stick containing the LUT file into the USB port of the video display. 2 Select [Adjustment] [Detail Settings] [LUT Import]. 3 Select the LUT file to import. • In the [Filename] field, search and display a file with extension ".clut" and ".cube" in the root folder. 4 Select the LUT type. • Refer to the "Concept Drawing of Display Image Processing and LUT" ( 12). 5 Select the LUT No. to save the LUT. 6 Select the color gamut that will be the standard (when [Gamut LUT] under [LUT Type] is selected). • Select the color gamut used when creating the LUT. 7 Select [Execute]. • When the confirmation screen appears, select [OK]. Import starts. Note • Import of [1D-LUT] and [3D-LUT] can also be set from [Adjustment] [CDL/User LUT] [1D-LUT] or [3D-LUT] [LUT Import]. • The LUT file (.clut format) is proprietary to Canon Video Display. Refer to the Canon website for the file format and how to create the LUT file. • Up to 1000 LUT import files are recognized. • You can delete the imported LUT, as well as rename the LUT ( 36). The configuration of LUT files (cube format) is shown below. „„LUT filename Type of characters that can be used No. of characters that can be used Extension One-byte alphabetical characters and numbers only Up to 48 characters (including the extension) .cube
-
 1
1 -
2
-
3
-
4
-
5
-
 6
6 -
 7
7 -
 8
8 -
 9
9 -
 10
10 -
 11
11 -
 12
12 -
 13
13 -
 14
14 -
 15
15 -
 16
16 -
17
-
18
-
19
-
20
-
21
-
22
-
23
-
24
-
25
-
26
-
27
-
28
-
29
-
30
-
31
-
32
-
33
-
34
-
35
-
36
-
37
-
38
-
39
-
40
-
41
-
42
-
43
-
44
-
45
-
46
-
47
-
48
-
49
-
50
-
51
-
52
-
53
-
54
-
55
-
56
-
57
-
58
-
59
-
60
-
61
-
62
-
63
-
64
-
65
-
66
-
67
-
68
-
69
-
70
-
71
-
72
-
73
-
74
-
75
-
76
-
77
-
78
-
79
-
80
-
81
-
82
-
83
-
84
-
85
-
86
-
87
-
88
-
89
-
90
-
91
-
92
-
93
-
94
-
95
-
96
-
97
-
98
-
99
-
100
-
101
-
102
-
103
-
104
-
105
-
106
-
107
-
108
-
109
-
110
-
111
-
112
-
113
-
114
-
115
-
116
-
117
-
118
-
119
-
120
-
121
-
122
-
123
-
124
-
125
-
126
-
127
 |
 |
