Canon DP-V1711 Video Display Operation Guide - Page 5
Adjusting Image Quality While Viewing the Entire Image, When adjustments are completed
 |
View all Canon DP-V1711 manuals
Add to My Manuals
Save this manual to your list of manuals |
Page 5 highlights
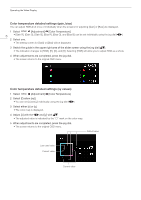
4 Select the setting to change. • Select the setting to change using the jog dial and press it to determine the selection. You will be returned to the Sub Menu item selection screen. 5 Exit menu. • Pressing the MENU button will return you to the Main Menu item selection screen. Pressing the MENU button again will close the menu screen. Operating the Video Display 5 Note • To adjust image quality, warming-up is necessary to stabilize the brightness of the video display. Wait at least 10 minutes after turning on the power before use. • The OSD menu and slider will disappear automatically if no operation is performed for approximately 1 minute. The F button will disappear automatically if no operation is performed for approximately 10 seconds. • The settings that cannot be set, are grayed out. • The following functions can be returned to their factory default settings or their anchor point ( after adjusting the image quality. -- [Contrast], [Brightness], [Chroma], [Sharpness], [Power], [Saturation], [Offset], [Slope] 7) by pressing the RESET button, When [Picture Mode] [User 1-7]: When executing calibration, pressing the RESET button while adjusting the image quality will return you to the settings after calibration. Adjusting Image Quality While Viewing the Entire Image You can adjust the OSD menu to display as a slider at the bottom of the screen. This allows for the image quality to be adjusted whilst it is displayed on the screen. 1 Press the jog dial when the selection frame is on setting options. • A slider appears at the bottom of the screen. 2 Make adjustments using the jog dial with using the slider as guide. 3 When adjustments are completed, press the jog dial. • The screen returns to the original OSD menu.
-
 1
1 -
 2
2 -
 3
3 -
 4
4 -
 5
5 -
 6
6 -
 7
7 -
 8
8 -
 9
9 -
 10
10 -
 11
11 -
12
-
13
-
14
-
15
-
16
-
17
-
18
-
19
-
20
-
21
-
22
-
23
-
24
-
25
-
26
-
27
-
28
-
29
-
30
-
31
-
32
-
33
-
34
-
35
-
36
-
37
-
38
-
39
-
40
-
41
-
42
-
43
-
44
-
45
-
46
-
47
-
48
-
49
-
50
-
51
-
52
-
53
-
54
-
55
-
56
-
57
-
58
-
59
-
60
-
61
-
62
-
63
-
64
-
65
-
66
-
67
-
68
-
69
-
70
-
71
-
72
-
73
-
74
-
75
-
76
-
77
-
78
-
79
-
80
-
81
-
82
-
83
-
84
-
85
-
86
-
87
-
88
-
89
-
90
-
91
-
92
-
93
-
94
-
95
-
96
-
97
-
98
-
99
-
100
-
101
-
102
-
103
-
104
-
105
-
106
-
107
-
108
-
109
-
110
-
111
-
112
-
113
-
114
-
115
-
116
-
117
-
118
-
119
-
120
-
121
-
122
-
123
-
124
-
125
-
126
-
127
 |
 |
