Canon DR1210C User Manual - Page 57
Punch Hole Removal, Text Orientation Recognition
 |
View all Canon DR1210C manuals
Add to My Manuals
Save this manual to your list of manuals |
Page 57 highlights
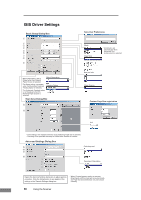
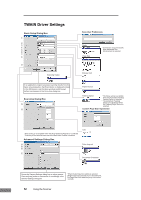
Chapter 2 Basic Setup Dialog Box a User Preference Name and save your settings. ) The name can consist of up to 32 characters. b Mode Selects the scanning mode. ) Selecting [24-bit Color] enables the [Color Smoothing] settings in the Advanced Settings dialog box. c Page Size Selects the size of the pages to be scanned. ) Selecting [Auto-detection] enables automatic page size detection when scanning. d Dots per inch Selects the scanning resolution. e Brightness Adjusts the brightness of scanned images. f Contrast Adjusts the contrast of scanned images ) [Contrast] is set automatically when the Advanced Text Enhancement mode is selected. g Paper Source Specifies the location of documents placed on the scanner. ) When [Auto] is selected, if a document is detected in the feeder, that document is automatically scanned. If no document is detected in the feeder, documents are scanned from the flatbed. ) When [Flatbed] is selected, documents are scanned from the flatbed. ) When [Feeder] is selected, documents are scanned from the feeder. h Feeding Option Selects the document feeding method. ) [Standard Feeding] scans all loaded documents when scanning is started from the application program. ) [Panel-Feeding] scans all loaded documents when scanning is started by pressing the scanner's scan button. ) [Automatic Feeding] starts scanning when the feeder detects a loaded document. i Prescan When scanning starts, one document is scanned and its image is displayed in the Prescan window. j Deskew When a document page feeds at a slant, the scanned image is straightened. k Scanning Option Specifies operation during scanning. ) [Standard]: After one page has been scanned and ejected, the next page is scanned. ) [Scan Ahead]: Scans document pages continuously. ) [Scan Single Page]: Scans only one page. Scan Area Dialog Box l Page Size Selects the size of the pages to be scanned. ) Click [Custom] to register a nonstandard document size as a custom page size. m Area Specifies the area to be scanned. ) These settings are disabled when [Autodetection] is selected for the page size. Advanced Settings Dialog Box n Edge emphasis Enhances the contours in scanned images. o Color drop-out Enabled for all scanning modes except [24bit Color], this function selects skipping (drop-out) or enhancement of red, green or blue when scanning documents. p Color Smoothing When scanning photos from magazines or catalogs with [24-bit Color] mode, you can use this function to remove moiré patterns from scanned color images. Selecting this check box activates pixel averaging in scanned images. q Document Orientation Specify clockwise rotation of scanned images according to the orientation of documents to be scanned. r Border Removal Removes the black border that may be created around scanned images. s Punch Hole Removal Removes the black holes created in scanned images when scanned documents have holes punched for binding. t Reverse Image When the [Black and White], [Error Diffusion] or [Advanced Text Enhancement] mode is selected, black and white are reversed in the scanned image. u Text Orientation Recognition Detects the text orientation in scanned images and rotates the images in 90° increments to normalize text orientation. v Rapid recovery system Select this function to prevent error reporting to the application program when feeding is interrupted due to a paper jam or similar error while scanning. After fixing the cause of the interruption, scanning can be quickly resumed with standard operations. This Quick Guide describes the TWAIN driver settings. Click the Help button for details. Using the Scanner 53
-
 1
1 -
2
-
3
-
4
-
5
-
6
-
7
-
8
-
9
-
10
-
11
-
12
-
13
-
14
-
15
-
16
-
17
-
18
-
19
-
20
-
21
-
22
-
23
-
24
-
25
-
26
-
27
-
28
-
29
-
30
-
31
-
32
-
33
-
34
-
35
-
36
-
37
-
38
-
39
-
40
-
41
-
42
-
43
-
44
-
45
-
46
-
47
-
48
-
49
-
50
-
51
-
 52
52 -
 53
53 -
 54
54 -
 55
55 -
 56
56 -
 57
57 -
 58
58 -
 59
59 -
 60
60 -
 61
61 -
 62
62 -
63
-
64
-
65
-
66
-
67
-
68
-
69
-
70
-
71
-
72
-
73
-
74
-
75
-
76
-
77
-
78
-
79
-
80
-
81
-
82
-
83
-
84
-
85
-
86
-
87
-
88
-
89
-
90
-
91
-
92
-
93
-
94
-
95
-
96
-
97
-
98
 |
 |
