Canon DR1210C User Manual - Page 59
Job Registration Tool Dialog Box, New/Editing Dialog Box, Admin Dialog Box, Save to My Pictures folder - dr 1210c drivers
 |
View all Canon DR1210C manuals
Add to My Manuals
Save this manual to your list of manuals |
Page 59 highlights
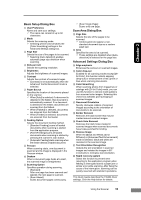
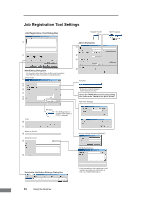
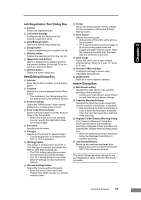
Chapter 2 Job Registration Tool Dialog Box a Job list Shows the registered jobs. b Job button settings Configures the Job Buttons on the scanner's operation panel. c [New/Editing] button Opens the New/Editing dialog box. d [Copy] button Copies a registered job to another Job No. e [Delete] button Deletes the selected job from the Job list. f [Selectable Job Button] Opens a dialog box for assigning jobs to the shortcut buttons (A through E) on the scanner's operation panel. g [Admin] button Opens the Admin dialog box. New/Editing Dialog Box h Job title Enter the job title to appear on the display panel. i Function Selects the function assigned to the Scan button. ) The contents of the Editing dialog box are determined by the selected function. j Scanner setting Opens the TWAIN driver's basic setting dialog box to configure the scanner. k Save to My Pictures folder Saves scanned images in the My Pictures folder in My Documents. ) When this check box is not checked, you can specify the destination folder for saving images. l File name Specifies the file name. m File type Selects the file format for saved images. ) The [Setting] button is enabled when PDF or TIFF is selected. n [Setting] button This button is enabled when the PDF or TIFF file type is selected, and opens the PDF or TIFF Setting dialog box. ) The PDF setting dialog box provides [Compression] and [OCR] settings. ) The TIFF setting dialog box provides [Multi-tiff setting] and [Compression] settings. o [Access setting] button Opens the Access setting dialog box. ) Enter the correct User name and Password to obtain access to a shared network folder. p Printer Shows the default printer. Printer settings can be changed by clicking the [Printer setting] button. q Print format Selects the printing size. ) [Actual size] prints at the same size as the document. ) [Fit to paper] resizes scanned images to fit on the printing paper when the images are larger than the paper. When the images are smaller than the paper, they are printed at actual size. r Save Image Select this check box to save images scanned using "Attach to E-mail" or "Send by E-mail". s Send by E-Mail settings Configures settings to send e-mail messages automatically. t [Add] button Adds an e-mail recipient's address. Admin Dialog Box u Mail Server setting Specifies the mail server to be used for sending e-mail messages. ) Contact your mail server's administrator for help with the mail server settings. v Capacity Warning Settings Specifies the folder for saved image files, and the capacity of that folder, in advance. ) After specifying the folder and starting to scan, a warning message is displayed when the specified capacity is reached while scanning. w Register Folder/Display Warning Dialog The [Capacity Observed Folder] and [Warning Size] items are enabled by specifying a Register Folder (number) and selecting the Display Warning Dialog check box. ) When the capacity warning is displayed, follow the displayed instructions to continue scanning. x Job Backup/Restore Backs up and restores registered jobs. ) Backup files can be restored on another DR-1210C document scanner. This Quick Guide describes settings for the Job Registration Tools. Click the Help button for details. Using the Scanner 55
-
 1
1 -
2
-
3
-
4
-
5
-
6
-
7
-
8
-
9
-
10
-
11
-
12
-
13
-
14
-
15
-
16
-
17
-
18
-
19
-
20
-
21
-
22
-
23
-
24
-
25
-
26
-
27
-
28
-
29
-
30
-
31
-
32
-
33
-
34
-
35
-
36
-
37
-
38
-
39
-
40
-
41
-
42
-
43
-
44
-
45
-
46
-
47
-
48
-
49
-
50
-
51
-
52
-
53
-
 54
54 -
 55
55 -
 56
56 -
 57
57 -
 58
58 -
 59
59 -
 60
60 -
 61
61 -
 62
62 -
 63
63 -
 64
64 -
65
-
66
-
67
-
68
-
69
-
70
-
71
-
72
-
73
-
74
-
75
-
76
-
77
-
78
-
79
-
80
-
81
-
82
-
83
-
84
-
85
-
86
-
87
-
88
-
89
-
90
-
91
-
92
-
93
-
94
-
95
-
96
-
97
-
98
 |
 |