Canon PIXMA iP6000D iP6000D Diect Print Guide - Page 5
Starts Easy-PhotoPrint. See Browsing Photos in the Memory Card on the Computer - paper feed
 |
View all Canon PIXMA iP6000D manuals
Add to My Manuals
Save this manual to your list of manuals |
Page 5 highlights
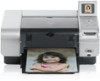
(9) Buttons Use these buttons, shown as arrows on the LCD, to select a menu item or photo, to specify the number of copies to print, to make print settings, or to scroll the screen. (10)Easy-PhotoPrint Startup Button Starts Easy-PhotoPrint. See "Browsing Photos in the Memory Card on the Computer" on page 62. (11)Save Button Saves data in the memory card onto the computer's hard disk. See "Saving Data in the Memory Card onto the Computer" on page 63. (12)Paper Feed Switch Selects the paper source. Press this toggle switch to change the paper source between the sheet feeder and cassette. (13)Trimming Button Allows you to trim the photo being displayed on the screen. See "Printing a Specified Area - Trimming" on page 32. (14) Buttons Press to enlarge or reduce the photo being displayed. Pressing this button in trimming mode allows you to enlarge/reduce the area to be trimmed. See "Trimming and Rotating the Sections you wish to Print." on page 32. (15)Cancel Button Press to cancel the settings you have made. If this button is pressed during printing, the printer aborts printing. (16)Print Button Press to start printing according to the settings displayed on the LCD. 4
-
 1
1 -
 2
2 -
 3
3 -
 4
4 -
 5
5 -
 6
6 -
 7
7 -
 8
8 -
 9
9 -
 10
10 -
 11
11 -
12
-
13
-
14
-
15
-
16
-
17
-
18
-
19
-
20
-
21
-
22
-
23
-
24
-
25
-
26
-
27
-
28
-
29
-
30
-
31
-
32
-
33
-
34
-
35
-
36
-
37
-
38
-
39
-
40
-
41
-
42
-
43
-
44
-
45
-
46
-
47
-
48
-
49
-
50
-
51
-
52
-
53
-
54
-
55
-
56
-
57
-
58
-
59
-
60
-
61
-
62
-
63
-
64
-
65
-
66
-
67
-
68
-
69
-
70
-
71
-
72
-
73
-
74
-
75
-
76
-
77
-
78
-
79
-
80
-
81
-
82
-
83
-
84
-
85
-
86
-
87
-
88
 |
 |
