Canon PIXMA mini320 mini320 series Direct Photo Guide - Page 40
Caution
 |
View all Canon PIXMA mini320 manuals
Add to My Manuals
Save this manual to your list of manuals |
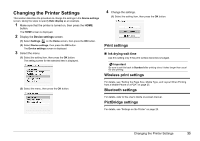
Page 40 highlights
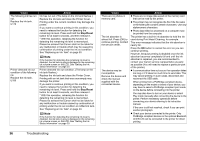
Cause Printer error has occurred. Turn off power then back on again. If problem persists, see the manual. Action Follow the procedure below to resolve the problem. (1) Turn off the printer, and unplug the power cord of the printer from the power supply. If you are attaching the optional battery, remove it once. (2) After a while, plug the power cord of the printer back in, and then turn on the printer. If the same error occurs, make sure that the ink tank is set properly. Caution If you cannot confirm that the ink tank is set properly since the Print Head Holder moves to the right, contact your Canon service representative. No battery. Turn printer off and use the AC adapter or install a charged battery. The card is currently write-enabled. Set to read-only mode before performing operation. An unsupported USB hub is connected. Remove the hub. If the ink tank is not set properly, do not remove it forcibly. See Step 5 of "Replacing an Ink Tank" on page 30 and set the ink tank properly. After that, perform the steps (1) and (2) above once again. The optional battery is running low. (1) Turn off the printer. (2) Connect the supplied AC adapter or attach the charged battery, then turn on the printer. For details on how to charge the battery, refer to the manual supplied with the battery. The Card Slot is set to Read/write mode. You cannot print in this mode. After writing on the memory card, set to Read-only mode again. If a PictBridge compliant device is connected via a USB hub, remove the hub and connect it directly to the printer. Cause Auto head align has failed. Press [OK] and repeat operation. Action Possible causes are as follows: z Paper of size other than 5" x 7" / 127.0 x 177.8 mm is loaded in the Rear Tray. Press the OK button on the printer to dismiss the error message, then load one sheet of the supplied 5" x 7" / 127.0 x 177.8 mm paper or same-sized Canon genuine paper* in the Rear Tray. z Paper is not loaded in the Rear Tray. Press the OK button on the printer to dismiss the error message, and then load paper in the Rear Tray. z Paper is loaded with the wrong side facing upwards. Press the OK button on the printer to dismiss the error message, then load one sheet of the supplied 5" x 7" / 127.0 x 177.8 mm paper or same-sized Canon genuine paper* with printing side up in the Rear Tray. z The Paper Guide is not touching the edge of paper. If the Paper Guide is not touching the edge of paper, the paper at a slant passes through inside the printer and the Auto Head Alignment may be failed. Press the OK button on the printer to dismiss the error message, then load one sheet of the supplied 5" x 7" / 127.0 x 177.8 mm paper or same-sized Canon genuine paper* in the Rear Tray. * Use the following paper. Photo Paper Plus Glossy PP-101 z Print Head nozzles are clogged. Press the OK button on the printer to dismiss the error message, and print the nozzle check pattern to check the status of the Print Head. To print the nozzle check pattern, see "Printing the Nozzle Check Pattern" on page 27. z The Paper Output Slot is exposed to strong light. Press the OK button on the printer to dismiss the error message, and then adjust your operating environment and/or the position of the printer so that the Paper Output Slot is not exposed directly to strong light. After carrying out the above measures, if the problem continues after aligning the Print Head again, press the OK button to dismiss the error message, and then perform Manual Print Head Alignment. Troubleshooting 37
-
 1
1 -
2
-
3
-
4
-
5
-
6
-
7
-
8
-
9
-
10
-
11
-
12
-
13
-
14
-
15
-
16
-
17
-
18
-
19
-
20
-
21
-
22
-
23
-
24
-
25
-
26
-
27
-
28
-
29
-
30
-
31
-
32
-
33
-
34
-
 35
35 -
 36
36 -
 37
37 -
 38
38 -
 39
39 -
 40
40 -
 41
41 -
 42
42 -
 43
43 -
 44
44 -
 45
45 -
46
-
47
-
48
-
49
-
50
-
51
-
52
-
53
-
54
-
55
-
56
-
57
-
58
-
59
 |
 |
