Canon PIXMA mini320 mini320 series Direct Photo Guide - Page 43
Cannot Connect to Computer Properly, Print Results Not Satisfactory - printer driver
 |
View all Canon PIXMA mini320 manuals
Add to My Manuals
Save this manual to your list of manuals |
Page 43 highlights
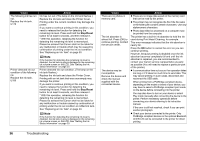
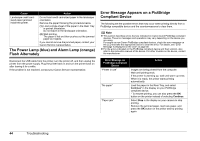
Cannot Connect to Computer Properly „ Printing Speed Is Slow/USB2.0 Hi-Speed Connection Does Not Work Cause Your system environment is not fully compatible with USB 2.0 Hi-Speed. Action If your system environment is not fully compatible with USB 2.0 Hi-Speed, the printer will operate at a lower speed provided under USB 1.1. In this case, the printer operates properly but printing speed may slow down due to communication speed. Check the following to ensure that your system environment supports USB 2.0 Hi-Speed connection. z The USB port on your computer supports USB 2.0 Hi- Speed connection. z The USB cable, and the USB hub if you are using one, support USB 2.0 Hi-Speed connection. Be sure to use a certified USB 2.0 Hi-Speed cable. We recommend the cable to be no longer than around 10 feet/3 meters. z The operating system of your computer supports USB 2.0 Hi-Speed connection. Obtain and install the latest update for your computer. z The USB 2.0 Hi-Speed driver operates properly. Obtain the latest version of the USB 2.0 Hi-Speed driver compatible with your hardware and install it on your computer. Important For details on USB 2.0 Hi-Speed of your system environment, contact the manufacturer of your computer, USB cable, or USB hub. „ "This device can perform faster" Message Is Displayed Cause Your system environment is not fully compatible with USB 2.0 Hi-Speed. Action Your system environment is not compatible with USB 2.0. See "Printing Speed Is Slow/USB2.0 Hi-Speed Connection Does Not Work" above. 40 Troubleshooting Print Results Not Satisfactory If the print result is not satisfactory such as white streaks, misaligned lines, and uneven colors, confirm the paper and print quality settings first. z Check 1: Do the page size and media type settings match the size and type of the loaded paper? When these settings are incorrect, you cannot obtain a proper print result. If you are printing a photograph or an illustration, incorrect paper type setting may reduce the quality of printout color. Also, if you print with an incorrect paper type setting, the printed surface may be scratched. In borderless printing, uneven coloring may occur depending on the combination of the paper type setting and the loaded paper. z Check 2: Did you set the print quality setting appropriately? Select a print quality option suitable to the paper and image for printing. If you notice blurs or uneven colors, increase the print quality setting and try printing again. * When printing from a PictBridge compliant device, set the print quality setting by using the Operation Panel on the printer. You cannot make this setting from a PictBridge compliant device. * You cannot change the print quality setting when printing from a wireless communication device. The method to confirm the paper and print quality settings differs depending on what you do with your printer. To print from your memory Confirm by using the Operation Panel on the printer. See card by operating the printer "Print Setting Screens" on page 15. To print from a PictBridge compliant device Confirm by using your PictBridge compliant device or the Operation Panel on the printer. See "Printing Photographs Directly from a Compliant Device" on page 21. To print from a wireless communication device Confirm by using the Operation Panel on the printer. When printing data through Infrared communication, see "Printing Photographs from a Wireless Communication Device" on page 25. To print from a computer When printing data through Bluetooth communication, refer to the User's Guide on-screen manual. Confirm by using the printer driver. Refer to the PC Printing Guide on-screen manual. z Check 3: If the problem is not resolved, there may be other causes. See also the sections below.
-
 1
1 -
2
-
3
-
4
-
5
-
6
-
7
-
8
-
9
-
10
-
11
-
12
-
13
-
14
-
15
-
16
-
17
-
18
-
19
-
20
-
21
-
22
-
23
-
24
-
25
-
26
-
27
-
28
-
29
-
30
-
31
-
32
-
33
-
34
-
35
-
36
-
37
-
 38
38 -
 39
39 -
 40
40 -
 41
41 -
 42
42 -
 43
43 -
 44
44 -
 45
45 -
 46
46 -
 47
47 -
 48
48 -
49
-
50
-
51
-
52
-
53
-
54
-
55
-
56
-
57
-
58
-
59
 |
 |
