Canon PIXMA mini320 mini320 series Direct Photo Guide - Page 7
Rear View, Interior, Battery Connector Cover, Carrying Handle, AC Adapter Connector - paper
 |
View all Canon PIXMA mini320 manuals
Add to My Manuals
Save this manual to your list of manuals |
Page 7 highlights
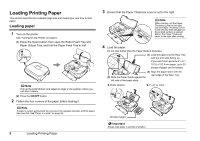
„ Rear View „ Interior Ink lamp Lights or flashes red to indicate the status of the ink tank. See "Replacing an Ink Tank" on page 31. Print Head Holder The print head is installed in advance. Battery Connector Cover Remove each cover to attach the optional Portable Kit. To attach the optional Portable Kit, refer to the instruction manual provided with the Portable Kit. AC Adapter Connector Connector used to connect the supplied AC Adapter plug. Carrying Handle Pull out this handle to carry the printer. 4 Printer Parts and Their Functions Print Head Lock Lever Locks the Print Head. Important Do not pull this lever up. If you have accidentally pulled them up, adjust the print head position. See "Aligning the Print Head" on page 29. Paper Thickness Lever Move to the right when printing. Move to the left if ink smudges or the printed surface is stained. Return to the right after printing. See "The Paper Thickness Lever position is incorrect." on page 42. Note For information on how to install the ink tank, refer to your setup sheet.
-
 1
1 -
 2
2 -
 3
3 -
 4
4 -
 5
5 -
 6
6 -
 7
7 -
 8
8 -
 9
9 -
 10
10 -
 11
11 -
 12
12 -
13
-
14
-
15
-
16
-
17
-
18
-
19
-
20
-
21
-
22
-
23
-
24
-
25
-
26
-
27
-
28
-
29
-
30
-
31
-
32
-
33
-
34
-
35
-
36
-
37
-
38
-
39
-
40
-
41
-
42
-
43
-
44
-
45
-
46
-
47
-
48
-
49
-
50
-
51
-
52
-
53
-
54
-
55
-
56
-
57
-
58
-
59
 |
 |
