Canon PIXMA mini320 mini320 series Direct Photo Guide - Page 48
Error Message on, PictBridge-Compliant, Device, Action, Power, Alarm
 |
View all Canon PIXMA mini320 manuals
Add to My Manuals
Save this manual to your list of manuals |
Page 48 highlights
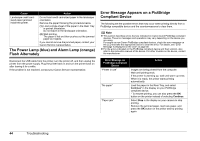
Error Message on PictBridge-Compliant Device "Paper lever error" "Printer cover open" "No print head" "Waste tank full"/ "Ink absorber full" "No ink"/"Ink cassette error" "Ink error" "Hardware Error" Action Normally set the Paper Thickness Lever to the right. Depending on the printing content, the printed surface may become scratched. In this case, set the Paper Thickness Lever to the left. * Return the Paper Thickness Lever to the right after printing. If you do not return the lever, the distance between the Print Head and printing paper stays broadened and the inside of the printer will easily get dirty. The image quality also may be decreased. Close the Printer Cover on the printer. The Print Head is not installed or defective. For details on how to resolve the error, see "Install the print head. U051 The type of print head is incorrect. Install the correct print head. U052" on page 35. The ink absorber is nearly full. For details on how to resolve the error, see "The ink absorber is almost full. Press [OK] to continue printing. Contact the service center." on page 36. An ink tank is not installed properly, or is out of ink. See the error message on the LCD and take the appropriate action to resolve the error. See "Error Message Is Displayed on the LCD" on page 35. An ink tank that was once empty is installed. For details on how to resolve the error, see "Printer detected ink out condition of the following ink. Replace the ink tank. U180" on page 36. The optional battery has running short. Follow the procedure below. (1) Turn the Printer off. (2) Connect the supplied AC adapter or attach the charged battery. (3) Turn the Printer on. The ink tank error has occurred. Replace the ink tank. See "Replacing an Ink Tank" on page 30. Error Message on PictBridge-Compliant Device "Printer error" Action An error requiring servicing might have occurred (Power lamp and Alarm lamp flash alternately). Disconnect the USB cable between the printer and the PictBridge compliant device, turn off the printer, and unplug the power cord of the printer from the power supply. After a while, plug the power cord of the printer back in, turn on the printer, and then reconnect the camera to the printer. If the same error occurs, contact your Canon service representative. Troubleshooting 45
-
 1
1 -
2
-
3
-
4
-
5
-
6
-
7
-
8
-
9
-
10
-
11
-
12
-
13
-
14
-
15
-
16
-
17
-
18
-
19
-
20
-
21
-
22
-
23
-
24
-
25
-
26
-
27
-
28
-
29
-
30
-
31
-
32
-
33
-
34
-
35
-
36
-
37
-
38
-
39
-
40
-
41
-
42
-
 43
43 -
 44
44 -
 45
45 -
 46
46 -
 47
47 -
 48
48 -
 49
49 -
 50
50 -
 51
51 -
 52
52 -
 53
53 -
54
-
55
-
56
-
57
-
58
-
59
 |
 |
