Canon PowerShot G16 User Guide - Page 168
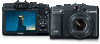
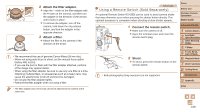
Connect the remote switch., Shoot.
 |
View all Canon PowerShot G16 manuals
Add to My Manuals
Save this manual to your list of manuals |
Page 168 highlights
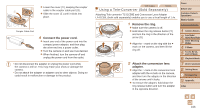
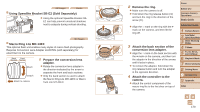
2 Attach the filter adapter. zzAlign the ○ mark on the filter adapter with the ● mark on the camera, and then turn the adapter in the direction of the arrows until it locks in place. zzTo remove the adapter, turn off the camera, hold down the ring release button, and turn the adapter in the opposite direction. 3 Attach a filter. zzAttach the filter to the camera in the direction of the arrow. • We recommend the use of genuine Canon filters (58 mm dia.). • When not using auto focus to shoot, set the manual focus option [Safety MF] to [On]. • If you use the built-in flash with the filter adapter attached, portions of the image may appear darker. • When using the filter adapter, be sure to use only one filter at a time. Attaching multiple filters, or accessories such as a heavy lens, may cause the attachments to fall off and become damaged. • Do not grip the filter adapter tightly. • Remove the filter adapter when not using a filter. • The filter adapter and a lens hood cannot be attached to the camera at the same time. Still Images Using a Remote Switch (Sold Separately) An optional Remote Switch RS-60E3 can be used to avoid camera shake that may otherwise occur when pressing the shutter button directly. This optional accessory is convenient when shooting at slow shutter speeds. 1 Connect the remote switch. zzMake sure the camera is off. zzOpen the terminal cover and insert the remote switch plug. 2 Shoot. zzTo shoot, press the release button on the remote switch. • Bulb photography (long exposures) is not supported. Cover Before Use Common Camera Operations Basic Guide Advanced Guide 1 Camera Basics 2 Auto Mode / Hybrid Auto Mode 3 Other Shooting Modes 4 P Mode 5 Tv, Av, M, C1, and C2 Mode 6 Playback Mode 7 Wi-Fi Functions 8 Setting Menu 9 Accessories 10 Appendix Index 168
-
 1
1 -
2
-
3
-
4
-
5
-
6
-
7
-
8
-
9
-
10
-
11
-
12
-
13
-
14
-
15
-
16
-
17
-
18
-
19
-
20
-
21
-
22
-
23
-
24
-
25
-
26
-
27
-
28
-
29
-
30
-
31
-
32
-
33
-
34
-
35
-
36
-
37
-
38
-
39
-
40
-
41
-
42
-
43
-
44
-
45
-
46
-
47
-
48
-
49
-
50
-
51
-
52
-
53
-
54
-
55
-
56
-
57
-
58
-
59
-
60
-
61
-
62
-
63
-
64
-
65
-
66
-
67
-
68
-
69
-
70
-
71
-
72
-
73
-
74
-
75
-
76
-
77
-
78
-
79
-
80
-
81
-
82
-
83
-
84
-
85
-
86
-
87
-
88
-
89
-
90
-
91
-
92
-
93
-
94
-
95
-
96
-
97
-
98
-
99
-
100
-
101
-
102
-
103
-
104
-
105
-
106
-
107
-
108
-
109
-
110
-
111
-
112
-
113
-
114
-
115
-
116
-
117
-
118
-
119
-
120
-
121
-
122
-
123
-
124
-
125
-
126
-
127
-
128
-
129
-
130
-
131
-
132
-
133
-
134
-
135
-
136
-
137
-
138
-
139
-
140
-
141
-
142
-
143
-
144
-
145
-
146
-
147
-
148
-
149
-
150
-
151
-
152
-
153
-
154
-
155
-
156
-
157
-
158
-
159
-
160
-
161
-
162
-
 163
163 -
 164
164 -
 165
165 -
 166
166 -
 167
167 -
 168
168 -
 169
169 -
 170
170 -
 171
171 -
 172
172 -
 173
173 -
174
-
175
-
176
-
177
-
178
-
179
-
180
-
181
-
182
-
183
-
184
-
185
-
186
-
187
-
188
-
189
-
190
-
191
-
192
-
193
-
194
-
195
-
196
-
197
-
198
-
199
-
200
-
201
-
202
-
203
-
204
-
205
-
206
-
207
-
208
-
209
-
210
-
211
-
212
-
213
-
214
 |
 |