Canon PowerShot G16 User Guide - Page 170
Using Speedlite Bracket SB-E2 Sold Separately
 |
View all Canon PowerShot G16 manuals
Add to My Manuals
Save this manual to your list of manuals |
Page 170 highlights
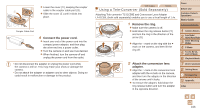
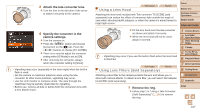
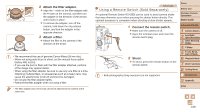
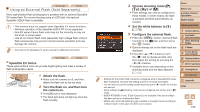
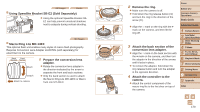
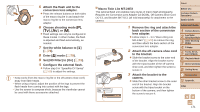
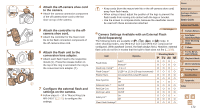
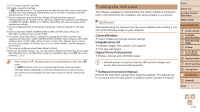
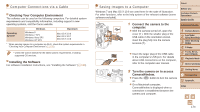
Still Images Movies Using Speedlite Bracket SB-E2 (Sold Separately) zzUsing the optional Speedlite Bracket SBE2 can help prevent unnatural shadows next to subjects during vertical shooting. Still Images Macro Ring Lite MR-14EX This optional flash unit enables many styles of macro flash photography. Requires Conversion Lens Adapter LA-DC58L (sold separately) for attachment to the camera. Back Front Section Section Attach Detach Attach to camera 1 Prepare the conversion lens adapter. zzRotate the conversion lens adapter in the direction indicated by the arrow to separate the front and back sections. zzOnly the back section is used to attach the Macro Ring Lite MR-14EX or Macro Twin Lite MT-24EX. 2 Remove the ring. zzMake sure the camera is off. zzHold down the ring release button ( ) and turn the ring in the direction of the arrow ( ). zzAlign the ○ mark on the ring with the ● mark on the camera, and then lift the ring off. 3 Attach the back section of the conversion lens adapter. zzAlign the ○ mark on the back section with the ● mark on the camera, and then turn the adapter in the direction of the arrows until it locks in place. zzTo remove the adapter, hold down the ring release button and turn the adapter in the opposite direction. 4 Attach the controller to the camera. zzAttach the control component of the macro ring lite to the hot shoe on top of the camera. Cover Before Use Common Camera Operations Basic Guide Advanced Guide 1 Camera Basics 2 Auto Mode / Hybrid Auto Mode 3 Other Shooting Modes 4 P Mode 5 Tv, Av, M, C1, and C2 Mode 6 Playback Mode 7 Wi-Fi Functions 8 Setting Menu 9 Accessories 10 Appendix Index 170
-
 1
1 -
2
-
3
-
4
-
5
-
6
-
7
-
8
-
9
-
10
-
11
-
12
-
13
-
14
-
15
-
16
-
17
-
18
-
19
-
20
-
21
-
22
-
23
-
24
-
25
-
26
-
27
-
28
-
29
-
30
-
31
-
32
-
33
-
34
-
35
-
36
-
37
-
38
-
39
-
40
-
41
-
42
-
43
-
44
-
45
-
46
-
47
-
48
-
49
-
50
-
51
-
52
-
53
-
54
-
55
-
56
-
57
-
58
-
59
-
60
-
61
-
62
-
63
-
64
-
65
-
66
-
67
-
68
-
69
-
70
-
71
-
72
-
73
-
74
-
75
-
76
-
77
-
78
-
79
-
80
-
81
-
82
-
83
-
84
-
85
-
86
-
87
-
88
-
89
-
90
-
91
-
92
-
93
-
94
-
95
-
96
-
97
-
98
-
99
-
100
-
101
-
102
-
103
-
104
-
105
-
106
-
107
-
108
-
109
-
110
-
111
-
112
-
113
-
114
-
115
-
116
-
117
-
118
-
119
-
120
-
121
-
122
-
123
-
124
-
125
-
126
-
127
-
128
-
129
-
130
-
131
-
132
-
133
-
134
-
135
-
136
-
137
-
138
-
139
-
140
-
141
-
142
-
143
-
144
-
145
-
146
-
147
-
148
-
149
-
150
-
151
-
152
-
153
-
154
-
155
-
156
-
157
-
158
-
159
-
160
-
161
-
162
-
163
-
164
-
 165
165 -
 166
166 -
 167
167 -
 168
168 -
 169
169 -
 170
170 -
 171
171 -
 172
172 -
 173
173 -
 174
174 -
 175
175 -
176
-
177
-
178
-
179
-
180
-
181
-
182
-
183
-
184
-
185
-
186
-
187
-
188
-
189
-
190
-
191
-
192
-
193
-
194
-
195
-
196
-
197
-
198
-
199
-
200
-
201
-
202
-
203
-
204
-
205
-
206
-
207
-
208
-
209
-
210
-
211
-
212
-
213
-
214
 |
 |
