Canon RM-9 V1.0 Network Video Recording Software RM Series Administrator s Man - Page 78
Motion Detection Recording Settings, Using the Camera for Motion Detection
 |
View all Canon RM-9 V1.0 manuals
Add to My Manuals
Save this manual to your list of manuals |
Page 78 highlights
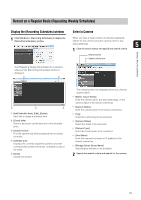
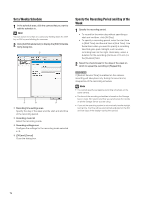
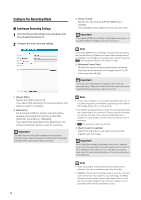
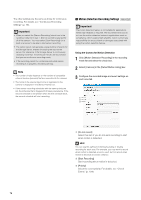
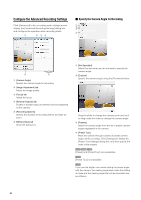
The other settings are the same as those for continuous recording. For details, see "Continuous Recording Settings" (p. 76). Important • When you select the [Sensor Recording] check box in the recoding mode list in step 1, [Do not record] is selected for all of the sensors. You must select [Start Recording] for at least one sensor to be able to start sensor recording. • The sensor inputs can generate a large number of events for the Storage Server, thereby increasing the load on the server. For reference, if the Storage Server is continuously receiving more than 10 events per minute, we recommend that you use continuous recording mode. • If the recording period for a schedule ends while sensor recording is in progress, recording will stop. Note • The number of tabs depends on the number of compatible external devices (sensors) that are connected to the camera. • The name of the external device that is registered in the camera is displayed in the [Sensor Name] box. • If two sensor recording schedules with the same priority are set, the schedule that is triggered first takes precedence. If the second schedule is still present when the first schedule ends, the second schedule will start recording. „ Motion Detection Recording Settings Important The motion detection feature is not suitable for applications where high reliability is required. We recommend that you do not use the motion detection feature in applications such as surveillance, which require high reliability. Canon cannot take responsibility for any accidents or damages associated with using the motion detection feature. Using the Camera for Motion Detection 1 Click [Motion Detection Recording] in the recording mode list and select the check box. 2 Select [Camera] in the [Detect Motion Using] box. 3 Configure the recorded image and event settings on each area tab. ➀ ➁ ➂ ➀ [Do not record] Select this item if you do not want recording to start when motion is detected. Hint You can use this setting to individually enable or disable recording for each area. For example, you may want to record when motion is detected around a vault, but not record when motion is detected around an entrance. ➁ [Start Recording] Start recording when motion is detected. ➂ [Priority] Select the event priority. For details, see "Check Events" (p. 104). 78
-
 1
1 -
2
-
3
-
4
-
5
-
6
-
7
-
8
-
9
-
10
-
11
-
12
-
13
-
14
-
15
-
16
-
17
-
18
-
19
-
20
-
21
-
22
-
23
-
24
-
25
-
26
-
27
-
28
-
29
-
30
-
31
-
32
-
33
-
34
-
35
-
36
-
37
-
38
-
39
-
40
-
41
-
42
-
43
-
44
-
45
-
46
-
47
-
48
-
49
-
50
-
51
-
52
-
53
-
54
-
55
-
56
-
57
-
58
-
59
-
60
-
61
-
62
-
63
-
64
-
65
-
66
-
67
-
68
-
69
-
70
-
71
-
72
-
 73
73 -
 74
74 -
 75
75 -
 76
76 -
 77
77 -
 78
78 -
 79
79 -
 80
80 -
 81
81 -
 82
82 -
 83
83 -
84
-
85
-
86
-
87
-
88
-
89
-
90
-
91
-
92
-
93
-
94
-
95
-
96
-
97
-
98
-
99
-
100
-
101
-
102
-
103
-
104
-
105
-
106
-
107
-
108
-
109
-
110
-
111
-
112
-
113
-
114
-
115
-
116
-
117
-
118
-
119
-
120
-
121
-
122
-
123
-
124
-
125
-
126
-
127
-
128
-
129
-
130
-
131
-
132
-
133
-
134
-
135
-
136
-
137
-
138
 |
 |
