Canon SD10 Software Starter Guide DC SD Ver.14 - Page 47
Remote Shooting
 |
UPC - 013803031867
View all Canon SD10 manuals
Add to My Manuals
Save this manual to your list of manuals |
Page 47 highlights
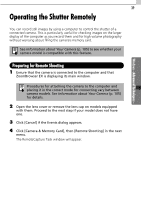
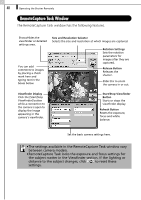
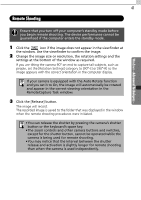
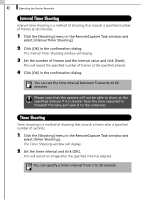
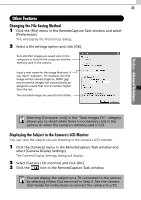
41 Remote Shooting Windows - Advanced Techniques - Ensure that you turn off your computer's standby mode before you begin remote shooting. The device performance cannot be guaranteed if the computer enters the standby mode. 1 Click the icon if the image does not appear in the viewfinder at the window. Use the viewfinder to confirm the image. 2 Change the image size or resolution, the rotation settings and the settings at the bottom of the window as required. If you are tilting the camera 90º on end to capture tall subjects, such as people, set the [Rotation Settings] category to [90º-L] or [90º-R] so the image appears with the correct orientation in the computer display. If your camera is equipped with the Auto Rotate function and you set it to On, the image will automatically be rotated and appear in the correct viewing orientation in the RemoteCapture Task window. 3 Click the [Release] button. The image will record. The recorded image is saved to the folder that was displayed in the window when the remote shooting procedures were initiated. •You can release the shutter by pressing the camera's shutter button or the keyboard's space key. •The zoom controls and other camera buttons and switches, except for the shutter button, cannot be operated while the camera is being used for remote shooting. •You may notice that the interval between the shutter release and activation is slightly longer for remote shooting than when the camera is used independently.
-
 1
1 -
2
-
3
-
4
-
5
-
6
-
7
-
8
-
9
-
10
-
11
-
12
-
13
-
14
-
15
-
16
-
17
-
18
-
19
-
20
-
21
-
22
-
23
-
24
-
25
-
26
-
27
-
28
-
29
-
30
-
31
-
32
-
33
-
34
-
35
-
36
-
37
-
38
-
39
-
40
-
41
-
 42
42 -
 43
43 -
 44
44 -
 45
45 -
 46
46 -
 47
47 -
 48
48 -
 49
49 -
 50
50 -
 51
51 -
 52
52 -
53
-
54
-
55
-
56
-
57
-
58
-
59
-
60
-
61
-
62
-
63
-
64
-
65
-
66
-
67
-
68
-
69
-
70
-
71
-
72
-
73
-
74
-
75
-
76
-
77
-
78
-
79
-
80
-
81
-
82
-
83
-
84
-
85
-
86
-
87
-
88
-
89
-
90
-
91
-
92
-
93
-
94
-
95
-
96
-
97
-
98
-
99
-
100
-
101
-
102
-
103
-
104
-
105
-
106
-
107
-
108
-
109
-
110
-
111
-
112
-
113
-
114
-
115
-
116
-
117
-
118
-
119
-
120
-
121
-
122
-
123
-
124
 |
 |
