Canon SD980 PowerShot SD980 IS / DIGITAL IXUS 200 IS Camera User Guide - Page 111
Checking the Focus
 |
UPC - 013803115352
View all Canon SD980 manuals
Add to My Manuals
Save this manual to your list of manuals |
Page 111 highlights
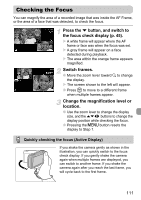
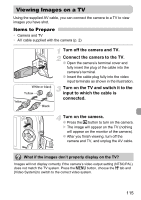
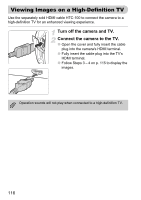
Checking the Focus You can magnify the area of a recorded image that was inside the AF Frame, or the area of a face that was detected, to check the focus. Press the p button, and switch to the focus check display (p. 45). X A white frame will appear where the AF frame or face was when the focus was set. X A gray frame will appear on a face detected during playback. X The area within the orange frame appears magnified. Switch frames. ● Move the zoom lever toward k to change the display. X The screen shown to the left will appear. ● Press m to move to a different frame when multiple frames appear. Change the magnification level or location. ● Use the zoom lever to change the display size, and the opqr buttons to change the display position while checking the focus. ● Pressing the n button resets the display to Step 1. Quickly checking the focus (Active Display) If you shake the camera gently as shown in the illustration, you can quickly switch to the focus check display. If you gently shake the camera again when multiple frames are displayed, you can switch to another frame. If you shake the camera again after you reach the last frame, you will cycle back to the first frame. 111
-
 1
1 -
2
-
3
-
4
-
5
-
6
-
7
-
8
-
9
-
10
-
11
-
12
-
13
-
14
-
15
-
16
-
17
-
18
-
19
-
20
-
21
-
22
-
23
-
24
-
25
-
26
-
27
-
28
-
29
-
30
-
31
-
32
-
33
-
34
-
35
-
36
-
37
-
38
-
39
-
40
-
41
-
42
-
43
-
44
-
45
-
46
-
47
-
48
-
49
-
50
-
51
-
52
-
53
-
54
-
55
-
56
-
57
-
58
-
59
-
60
-
61
-
62
-
63
-
64
-
65
-
66
-
67
-
68
-
69
-
70
-
71
-
72
-
73
-
74
-
75
-
76
-
77
-
78
-
79
-
80
-
81
-
82
-
83
-
84
-
85
-
86
-
87
-
88
-
89
-
90
-
91
-
92
-
93
-
94
-
95
-
96
-
97
-
98
-
99
-
100
-
101
-
102
-
103
-
104
-
105
-
 106
106 -
 107
107 -
 108
108 -
 109
109 -
 110
110 -
 111
111 -
 112
112 -
 113
113 -
 114
114 -
 115
115 -
 116
116 -
117
-
118
-
119
-
120
-
121
-
122
-
123
-
124
-
125
-
126
-
127
-
128
-
129
-
130
-
131
-
132
-
133
-
134
-
135
-
136
-
137
-
138
-
139
-
140
-
141
-
142
-
143
-
144
-
145
-
146
-
147
-
148
-
149
-
150
-
151
-
152
-
153
-
154
-
155
-
156
-
157
-
158
-
159
-
160
-
161
-
162
-
163
-
164
-
165
-
166
-
167
-
168
-
169
-
170
 |
 |
