Canon VIXIA HF S100 VIXIA HF S10 / HF S100 Manual - Page 135
Transfer Orders
 |
View all Canon VIXIA HF S100 manuals
Add to My Manuals
Save this manual to your list of manuals |
Page 135 highlights
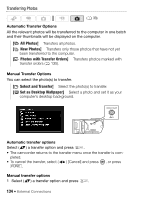
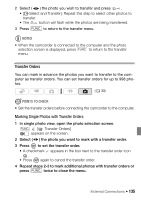
2 Select ( ) the photo you wish to transfer and press . • [ Select and Transfer]: Repeat this step to select other photos to transfer. • The button will flash while the photos are being transferred. 3 Press FUNC. to return to the transfer menu. NOTES • When the camcorder is connected to the computer and the photo selection screen is displayed, press FUNC. to return to the transfer menu. Transfer Orders You can mark in advance the photos you want to transfer to the computer as transfer orders. You can set transfer orders for up to 998 photos. ( 33) POINTS TO CHECK • Set the transfer orders before connecting the camcorder to the computer. Marking Single Photos with Transfer Orders 1 In single photo view, open the photo selection screen. FUNC. [ Transfer Orders] appears on the screen. 2 Select ( ) the photo you want to mark with a transfer order. 3 Press to set the transfer order. • A checkmark appears in the box next to the transfer order icon . • Press again to cancel the transfer order. 4 Repeat steps 2-3 to mark additional photos with transfer orders or press FUNC. twice to close the menu. External Connections Š 135
-
 1
1 -
2
-
3
-
4
-
5
-
6
-
7
-
8
-
9
-
10
-
11
-
12
-
13
-
14
-
15
-
16
-
17
-
18
-
19
-
20
-
21
-
22
-
23
-
24
-
25
-
26
-
27
-
28
-
29
-
30
-
31
-
32
-
33
-
34
-
35
-
36
-
37
-
38
-
39
-
40
-
41
-
42
-
43
-
44
-
45
-
46
-
47
-
48
-
49
-
50
-
51
-
52
-
53
-
54
-
55
-
56
-
57
-
58
-
59
-
60
-
61
-
62
-
63
-
64
-
65
-
66
-
67
-
68
-
69
-
70
-
71
-
72
-
73
-
74
-
75
-
76
-
77
-
78
-
79
-
80
-
81
-
82
-
83
-
84
-
85
-
86
-
87
-
88
-
89
-
90
-
91
-
92
-
93
-
94
-
95
-
96
-
97
-
98
-
99
-
100
-
101
-
102
-
103
-
104
-
105
-
106
-
107
-
108
-
109
-
110
-
111
-
112
-
113
-
114
-
115
-
116
-
117
-
118
-
119
-
120
-
121
-
122
-
123
-
124
-
125
-
126
-
127
-
128
-
129
-
 130
130 -
 131
131 -
 132
132 -
 133
133 -
 134
134 -
 135
135 -
 136
136 -
 137
137 -
 138
138 -
 139
139 -
 140
140 -
141
-
142
-
143
-
144
-
145
-
146
-
147
-
148
-
149
-
150
-
151
-
152
-
153
-
154
-
155
-
156
-
157
-
158
-
159
-
160
-
161
-
162
-
163
-
164
-
165
-
166
-
167
-
168
-
169
-
170
-
171
-
172
-
173
-
174
-
175
-
176
-
177
-
178
-
179
-
180
-
181
-
182
-
183
-
184
-
185
-
186
-
187
-
188
-
189
-
190
-
191
 |
 |