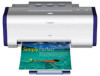
Canon i320 i320 Quick Start Guide - Page 46

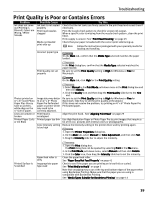
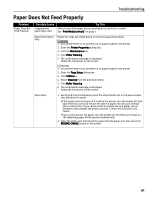
Problem, Possible Cause, Try

Page 46 highlights

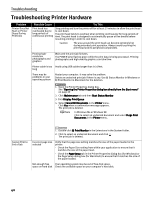
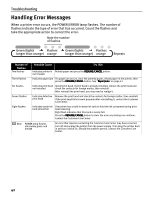
Troubleshooting Problem Have you replaced an ink tank with a new one? message appears Possible Cause If the ink tank has been replaced with a new one. Try This Click Yes or OK to reset the ink counter. See "Resetting the Ink Counter" on page 34 If the front cover has been open for a certain period (the ink tank has not been replaced). Click No or Cancel on the dialog box described above. You can choose the option to disable the display of this confirmation message. 1. Ensure the printer is on and open the Printer Properties dialog box. 2. On the Maintenance tab, click Low Ink Warning Setting. 3. Clear a check box of Display a confirmation message of Ink tank replacement and click Send. 1. Ensure the printer is on and open the Page Setup dialog box. 2. Click Utilities to open the Printer Utility dialog box. 3. Select Remaining Ink level Setting from the pull-down menu and click Low Ink Warning Setting. 4. Clear a check box of Display a confirmation message of Ink tank replacement and click Send. 44

  • 1
  • 2
  • 3
  • 4
  • 5
  • 6
  • 7
  • 8
  • 9
  • 10
  • 11
  • 12
  • 13
  • 14
  • 15
  • 16
  • 17
  • 18
  • 19
  • 20
  • 21
  • 22
  • 23
  • 24
  • 25
  • 26
  • 27
  • 28
  • 29
  • 30
  • 31
  • 32
  • 33
  • 34
  • 35
  • 36
  • 37
  • 38
  • 39
  • 40
  • 41
  • 42
  • 43
  • 44
  • 45
  • 46
  • 47
  • 48
  • 49
  • 50
  • 51
  • 52
  • 53
  • 54
  • 55
  • 56

Troubleshooting
44
Have you replaced
an ink tank with a
new one? message
appears
If the ink tank has
been replaced with
a new one.
Click Yes
Yes
Yes
Yes or OK
OK
OK
OK to reset the ink counter.
See "Resetting the Ink Counter
Resetting the Ink Counter
Resetting the Ink Counter" on page 34
If the front cover
has been open for a
certain period (the
ink tank has not
been replaced).
Click No
No
No
No or Cancel
Cancel
Cancel
Cancel on the dialog box described above.
You can choose the option to disable the display of this confirmation message.
1.
Ensure the printer is on and open the Printer Properties
Printer Properties
Printer Properties
Printer Properties dialog box.
2.
On the Maintenance
Maintenance
Maintenance
Maintenance tab, click Low Ink
Low Ink
Low Ink
Low Ink Warning Setting
Warning Setting
Warning Setting
Warning Setting.
3.
Clear a check box of Display a confirmation message of Ink tank replacement
Display a confirmation message of Ink tank replacement
and click Send
Send
Send
Send.
1.
Ensure the printer is on and open the Page Setup
Page Setup
Page Setup
Page Setup dialog box.
2.
Click Utilities
Utilities
Utilities
Utilities to open the Printer Utility
Printer Utility
Printer Utility
Printer Utility dialog box.
3.
Select Remaining Ink level Setting
Remaining Ink level Setting
Remaining Ink level Setting from the pull-down menu and click Low
Low
Low
Low
Ink Warning Setting
Ink Warning Setting
Ink Warning Setting
Ink Warning Setting.
4.
Clear a check box of Display a confirmation message of Ink tank replacement
Display a confirmation message of Ink tank replacement
and click Send
Send
Send
Send.
Problem
Possible Cause
Try This