Canon imageCLASS MF7460 imageCLASS MF7400 Series Reference Guide - Page 69
Useful Functions, Automatic Paper Selection/Automatic Drawer Switching
 |
View all Canon imageCLASS MF7460 manuals
Add to My Manuals
Save this manual to your list of manuals |
Page 69 highlights
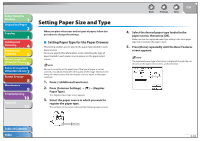
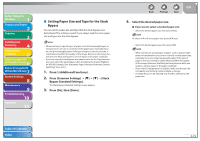
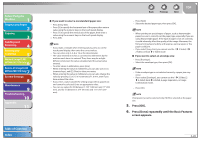
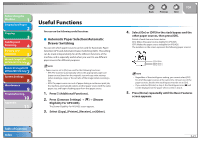
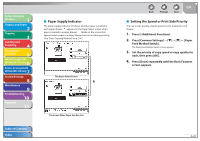
Before Using the Machine 1 Original and Paper 2 Copying 3 Sending and Receiving 4 Printing and Scanning 5 Network (imageCLASS 6 MF7480/MF7470 Only) Remote UI (imageCLASS 7 MF7480/MF7470 Only) System Settings 8 Maintenance 9 Troubleshooting 10 Appendix 11 Useful Functions You can use the following useful functions. ˙ Automatic Paper Selection/Automatic Drawer Switching You can set which paper sources can be used for Automatic Paper Selection (APS) and Automatic Drawer Switching (ADS). This setting can be made independently for all the different functions of the machine, and is especially useful when you want to use different paper sources for different purposes. - Paper sources set to [On] are used for the following functions: - APS: The machine automatically selects the appropriate paper size (paper source) based on the original's size and copy ratio settings (when making a copy), or the set ratio of the image (when receiving a fax). - ADS: If a paper source runs out of paper during a continuous print job, the machine automatically selects another paper source with the same paper size, and begins feeding paper from that paper source. 1. Press (Additional Functions). 2. Press [Common Settings Drawer Eligibility For APS/ADS]. The Drawer Eligibility For APS/ADS screen appears. 3. Select [Copy], [Printer], [Receive], or [Other]. Table of Contents Index Back Previous Next TOP 4. Select [On] or [Off] for the stack bypass and the other paper sources, then press [OK]. Details of each item are shown below. [On]: Makes the paper source eligible for APS/ADS. [Off ]: Makes the paper source ineligible for APS/ADS. The numbers on the screen represent the following paper sources: Stack Bypass Paper Drawer 1 Paper Drawer 2 - Regardless of the stack bypass setting, you cannot select [Off ] for all of the paper sources at the same time. At least one of the paper sources, besides the stack bypass must be set to [On]. - If you selected [Printer] in step 3, the Stack Bypass icon ( ) will not be displayed on the paper select screen in step 4. 5. Press [Done] repeatedly until the Basic Features screen appears. 2-21
-
 1
1 -
2
-
3
-
4
-
5
-
6
-
7
-
8
-
9
-
10
-
11
-
12
-
13
-
14
-
15
-
16
-
17
-
18
-
19
-
20
-
21
-
22
-
23
-
24
-
25
-
26
-
27
-
28
-
29
-
30
-
31
-
32
-
33
-
34
-
35
-
36
-
37
-
38
-
39
-
40
-
41
-
42
-
43
-
44
-
45
-
46
-
47
-
48
-
49
-
50
-
51
-
52
-
53
-
54
-
55
-
56
-
57
-
58
-
59
-
60
-
61
-
62
-
63
-
 64
64 -
 65
65 -
 66
66 -
 67
67 -
 68
68 -
 69
69 -
 70
70 -
 71
71 -
 72
72 -
 73
73 -
 74
74 -
75
-
76
-
77
-
78
-
79
-
80
-
81
-
82
-
83
-
84
-
85
-
86
-
87
-
88
-
89
-
90
-
91
-
92
-
93
-
94
-
95
-
96
-
97
-
98
-
99
-
100
-
101
-
102
-
103
-
104
-
105
-
106
-
107
-
108
-
109
-
110
-
111
-
112
-
113
-
114
-
115
-
116
-
117
-
118
-
119
-
120
-
121
-
122
-
123
-
124
-
125
-
126
-
127
-
128
-
129
-
130
-
131
-
132
-
133
-
134
-
135
-
136
-
137
-
138
-
139
-
140
-
141
-
142
-
143
-
144
-
145
-
146
-
147
-
148
-
149
-
150
-
151
-
152
-
153
-
154
-
155
-
156
-
157
-
158
-
159
-
160
-
161
-
162
-
163
-
164
-
165
-
166
-
167
-
168
-
169
-
170
-
171
-
172
-
173
-
174
-
175
-
176
-
177
-
178
-
179
-
180
-
181
-
182
-
183
-
184
-
185
-
186
-
187
-
188
-
189
-
190
-
191
-
192
-
193
-
194
-
195
-
196
-
197
-
198
-
199
-
200
-
201
-
202
-
203
-
204
-
205
-
206
-
207
-
208
-
209
-
210
-
211
-
212
-
213
-
214
-
215
-
216
-
217
-
218
-
219
-
220
-
221
-
222
-
223
-
224
-
225
-
226
-
227
-
228
-
229
-
230
-
231
-
232
-
233
-
234
-
235
-
236
-
237
-
238
-
239
-
240
-
241
-
242
-
243
-
244
-
245
-
246
-
247
-
248
-
249
-
250
-
251
-
252
-
253
-
254
-
255
-
256
-
257
-
258
-
259
-
260
-
261
-
262
-
263
-
264
-
265
-
266
-
267
-
268
-
269
-
270
-
271
-
272
-
273
-
274
-
275
-
276
-
277
-
278
-
279
-
280
-
281
-
282
-
283
-
284
-
285
-
286
-
287
-
288
-
289
-
290
-
291
-
292
-
293
-
294
-
295
-
296
-
297
-
298
-
299
-
300
-
301
-
302
-
303
-
304
-
305
-
306
-
307
-
308
-
309
-
310
-
311
-
312
-
313
-
314
-
315
-
316
-
317
-
318
-
319
-
320
-
321
-
322
-
323
-
324
-
325
-
326
-
327
-
328
-
329
-
330
-
331
-
332
-
333
-
334
-
335
-
336
-
337
-
338
-
339
-
340
-
341
-
342
-
343
-
344
-
345
-
346
-
347
-
348
-
349
-
350
-
351
-
352
-
353
-
354
-
355
-
356
-
357
-
358
-
359
-
360
-
361
-
362
-
363
-
364
-
365
-
366
-
367
-
368
-
369
-
370
-
371
-
372
-
373
-
374
-
375
-
376
-
377
-
378
-
379
-
380
-
381
-
382
-
383
-
384
-
385
-
386
-
387
-
388
-
389
-
390
-
391
-
392
-
393
-
394
-
395
-
396
-
397
-
398
-
399
-
400
-
401
-
402
-
403
-
404
-
405
-
406
-
407
-
408
-
409
-
410
-
411
-
412
-
413
-
414
-
415
-
416
-
417
-
418
-
419
-
420
-
421
-
422
-
423
-
424
-
425
-
426
-
427
-
428
-
429
-
430
-
431
-
432
-
433
-
434
-
435
-
436
-
437
-
438
-
439
-
440
-
441
-
442
-
443
-
444
-
445
-
446
-
447
-
448
-
449
-
450
-
451
-
452
-
453
-
454
-
455
-
456
-
457
-
458
-
459
-
460
-
461
-
462
-
463
-
464
-
465
-
466
-
467
-
468
-
469
-
470
-
471
-
472
-
473
-
474
-
475
-
476
-
477
-
478
-
479
-
480
-
481
-
482
-
483
-
484
 |
 |
