Canon imageFORMULA DR-M140 Document Scanner Reference Guide - Page 36
When [Enable continuous scanning] is set to [ON], When [Check output after scanning] is set to [ON]
 |
View all Canon imageFORMULA DR-M140 Document Scanner manuals
Add to My Manuals
Save this manual to your list of manuals |
Page 36 highlights
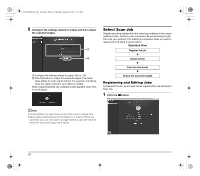
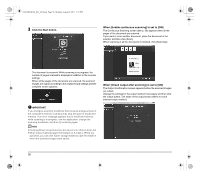
0-00-DR-M140_RG_UK.book Page 36 Monday, August 8, 2011 5:15 PM 3 Click the Start button. When [Enable continuous scanning] is set to [ON] The Continuous Scanning screen (see p. 39) appears when all the pages of the document are scanned. If you want to scan another document, place the document in the scanner and then click [Scan]. When scanning of all the documents is finished, click [Next step]. The document is scanned. While scanning is in progress, the number of pages scanned is displayed in addition to the scanner settings. When all the pages of the document are scanned, the scanned images are output according to the registered job settings and the complete screen appears. When [Check output after scanning] is set to [ON] The Output Confirmation screen appears before the scanned images are output. Change the settings for the output method if necessary and then click the output button. The name of the output button differs for each selected output method. IMPORTANT If you configure scanning conditions that consume a large amount of the computer's memory, scanning may stop because of insufficient memory. If an error message appears due to insufficient memory while scanning is in progress, exit the application, change the scanning conditions, and then try scanning again. Hint • Clicking [Return to top] returns to the top screen of Select Scan Job. • When output methods apart from [Attach to E-mail] or [Print] are specified, you can click [Open storage folder] to open the folder in which the scanned images were saved. 36
-
 1
1 -
2
-
3
-
4
-
5
-
6
-
7
-
8
-
9
-
10
-
11
-
12
-
13
-
14
-
15
-
16
-
17
-
18
-
19
-
20
-
21
-
22
-
23
-
24
-
25
-
26
-
27
-
28
-
29
-
30
-
 31
31 -
 32
32 -
 33
33 -
 34
34 -
 35
35 -
 36
36 -
 37
37 -
 38
38 -
 39
39 -
 40
40 -
 41
41 -
42
-
43
-
44
-
45
-
46
-
47
-
48
-
49
-
50
-
51
-
52
-
53
-
54
-
55
-
56
 |
 |
