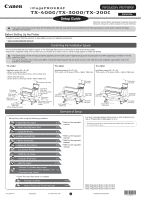
Canon imagePROGRAF TX-3000 MFP T36 imagePROGRAF TX-4000 / TX-3000 / TX-2000 Se - Page 4
supporting plate., with the position of the holes on rod 2 attached to the supporting
 |
View all Canon imagePROGRAF TX-3000 MFP T36 manuals
Add to My Manuals
Save this manual to your list of manuals |
Page 4 highlights
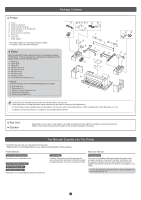
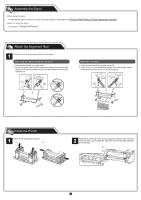
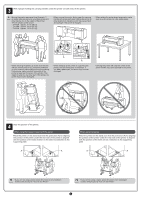
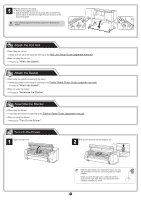
3 With 3 people holding the carrying handles under the printer on both ends, lift the printer. • Moving the printer requires at least 6 people, 3 Caution on either side. Be careful to avoid back strain and other injuries due to the weight of the printer. - TX-4000 : Approx. 211 lb (96 kg) - TX-3000 : Approx. 191 lb (87 kg) - TX-2000 : Approx. 163 lb (74 kg) • When moving the printer, firmly grasp the carrying handles (A) under each side. Holding the printer at other positions is dangerous and may cause injury and damage if the printer is dropped. • When setting the printer down temporarily, make sure to put the printer on a flat, stable place. A A • When standing the printer up, make sure the side with the control panel is up, and place cardboard or other material underneath to prevent scratching. Furthermore, make sure that the weight of the printer is taken by the corner of the printer. If the weight is taken by any other part of the printer, the printer may become damaged. • When standing up the printer or supporting the printer, hold the metal parts of the printer. If you hold a plastic part, the printer may become damaged. • Carrying the printer with only the center of the printer loaded may cause damage to the printer. 4 Align the position of the printer. When using the basket included with the stand Place the printer on the stand such that the protrusion (A) for aligning the position of the printer under the rear side of the printer is aligned with the position of the black marker on the stand rod attached to the supporting plate. A A When using the stacker Place the printer on the stand such that the protrusion (A) for aligning the position of the printer under the rear side of the printer is aligned with the position of the holes on rod 2 attached to the supporting plate. A A • If you are not using a stand, place the printer in the installation Important location and proceed to "Turn On the Printer". • If you are not using a stand, place the printer in the installation Important location and proceed to "Turn On the Printer". 4
-
 1
1 -
 2
2 -
 3
3 -
 4
4 -
 5
5 -
 6
6 -
 7
7 -
 8
8 -
 9
9 -
 10
10 -
11
-
12
-
13
-
14
 |
 |
