Canon imagePROGRAF TX-3000 MFP T36 imagePROGRAF TX-4000 / TX-3000 / TX-2000 Se - Page 8
Lift up the ink tank lock lever once and, Close the ink tank covers.
 |
View all Canon imagePROGRAF TX-3000 MFP T36 manuals
Add to My Manuals
Save this manual to your list of manuals |
Page 8 highlights
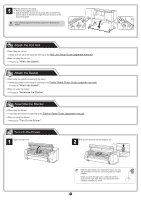
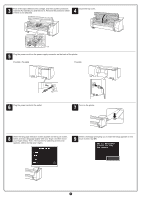
7 Lift up the ink tank lock lever once and then push it down. 8 Firmly push down the handle part of the ink tank lock lever all the way in. 9 Make sure the ink lamp lights red. 10 Repeat steps 2 to 9 to install each of the ink tanks. Close the ink tank covers. When the screen for confirming installation of the ink tank appears, tap OK. • If the ink lamp does not light, repeat Important steps 2, 3, 7, and 8. 8
-
 1
1 -
2
-
 3
3 -
 4
4 -
 5
5 -
 6
6 -
 7
7 -
 8
8 -
 9
9 -
 10
10 -
 11
11 -
 12
12 -
 13
13 -
14
 |
 |

8
7
Lift up the ink tank lock lever once and
then push it down.
8
Firmly push down the handle part of the
ink tank lock lever all the way in.
9
Make sure the ink lamp lights red.
Important
• If the ink lamp does not light, repeat
steps 2, 3, 7, and 8.
10
Repeat steps 2 to 9 to install each of the
ink tanks.
Close the ink tank covers.
When the screen for confirming
installation of the ink tank appears, tap
OK
.