Canon imagePROGRAF TX-3000 MFP T36 imagePROGRAF TX-4000 / TX-3000 / TX-2000 Se - Page 9
Install the Print Head
 |
View all Canon imagePROGRAF TX-3000 MFP T36 manuals
Add to My Manuals
Save this manual to your list of manuals |
Page 9 highlights
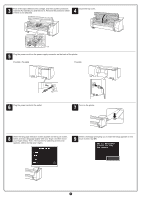
Install the Print Head 1 When the instruction to open the top cover appears on the screen, open the top cover. 2 Tilt the print head lock lever you. towards 3 Open the print head locking cover by following the instructions on the screen, and tap OK. Do not touch the contacts (A) on the carriage. Instructions are now shown on the screen regarding print head installation. A 4 Remove the print head from the bag by holding the tab parts (A). A A 5 Remove the orange protective caps (A and B). Remove the protective cap (B) by holding the tab part (C). B C A • Do not touch the part that was being Important protected by the protective cap under any circumstances. Touching it may cause damage to the print head or printing problems. • The print head contains ink, so be careful not to spill it once the protective caps are removed. • Do not reattach the protective caps after removing them. Dispose of them according to local regulations. 6 Insert the print head into the carriage with the ink holes (A) on the upper side and facing towards you as shown in the figure. Carefully push the print head firmly into the carriage, ensuring that the part covered by the protective caps does not touch the carriage. A 7 Pull the print head locking cover down toward the front to lock the print head in place. 8 Push the print head lock lever way to the end. all the 9 Close the top cover. 9 • If the roll unit is installed, the roll unit Note calibration starts automatically after the print head is attached. If the roll holder is mounted on the roll unit at this time, calibration cannot be executed. Do not mount the roll holder on the roll unit until the setup has finished.
-
 1
1 -
2
-
3
-
 4
4 -
 5
5 -
 6
6 -
 7
7 -
 8
8 -
 9
9 -
 10
10 -
 11
11 -
 12
12 -
 13
13 -
 14
14
 |
 |
