Casio CLASSPad300 User Manual - Page 3
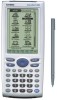
Getting Started, User Registration - classpad 300 cable
 |
UPC - 079767161071
View all Casio CLASSPad300 manuals
Add to My Manuals
Save this manual to your list of manuals |
Page 3 highlights
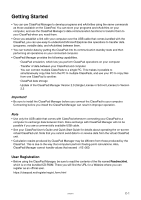
Getting Started • You can use ClassPad Manager to develop programs and eActivities using the same commands as those available on the ClassPad. You can store your programs and eActivities on your computer, and use the ClassPad Manager's data communication functions to transfer them to your ClassPad when you need them. • Once you establish a link with your computer over the USB cable that comes bundled with the ClassPad, you can use easy-to-understand Microsoft Explorer-like operations to transfer data (programs, variable data, and eActivities) between them. • You can transfer data by putting the ClassPad into its communication standby state and then performing all operations on your connected computer. • ClassPad Manager provides the following capabilities. · ClassPad emulation, which lets you perform ClassPad operations on your computer · Transfer of data between your ClassPad and computer You can connect multiple ClassPads to a single PC. This makes it possible to simultaneously copy files from the PC to multiple ClassPads, and use your PC to copy files from one ClassPad to another. · ClassPad data storage · Update of the ClassPad Manager Version 2.0 (Single License or School License) to Version 2.2 Important! • Be sure to install the ClassPad Manager before you connect the ClassPad to your computer. Connecting before you install the ClassPad Manager can result in improper operation. Note • Use only the USB cable that comes with ClassPad whenever connecting your ClassPad to a computer to exchange data between them. Data exchange with ClassPad Manager will not be possible if you use a commercially available USB cable. • See your ClassPad User's Guide and Quick Start Guide for details about operating the on-screen virtual ClassPad unit. Note that you cannot send data to or receive data from the virtual ClassPad unit. • Calculation results produced by ClassPad Manager may be different from those produced by the ClassPad. This is due to the way that computers perform floating-point calculations. Also, ClassPad Manager cannot handle values that exceed ±1E+300. User Registration • Before using the ClassPad Manager, be sure to read the contents of the file named Readme.html, which is on the bundled CD-ROM. There you will find the URL for a Website where you can register as an official user. https://classpad.net/register/regist_form.html 200509501 E-1
-
 1
1 -
 2
2 -
 3
3 -
 4
4 -
 5
5 -
 6
6 -
 7
7 -
 8
8 -
 9
9 -
10
-
11
-
12
-
13
-
14
-
15
-
16
-
17
-
18
-
19
-
20
-
21
-
22
-
23
-
24
-
25
-
26
-
27
-
28
-
29
-
30
-
31
-
32
-
33
-
34
-
35
-
36
-
37
-
38
-
39
-
40
-
41
-
42
-
43
-
44
-
45
-
46
-
47
-
48
-
49
-
50
-
51
-
52
-
53
-
54
-
55
-
56
-
57
-
58
-
59
 |
 |