Casio CLASSPad300 User Manual - Page 44
Important, To establish connections between multiple ClassPads and ClassPad Manager
 |
UPC - 079767161071
View all Casio CLASSPad300 manuals
Add to My Manuals
Save this manual to your list of manuals |
Page 44 highlights
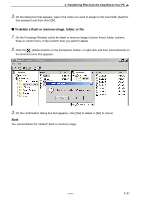
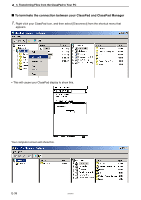
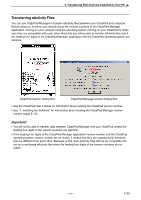
6. Transferring Files Between Multiple ClassPads and the PC k To establish connections between multiple ClassPads and ClassPad Manager Important! Connect the ClassPads one at a time. Do not connect a new ClassPad until you confirm that the first one has successfully connected. 1. Connect a ClassPad to a cable. The message "Standby ClassPad1 Press [Clear] key to terminate." should be displayed on each ClassPad. See page E-28 for a picture of what the ClassPad will display. 2. The PC will recognize the ClassPad as new hardware. Follow the instructions that appear on your computer screen to approve the ClassPad as new hardware. Important! If your PC is running Windows XP, be sure to choose [Continue Anyway] in the Hardware Installation dialog box that appears the first time a ClassPad is connected to a USB port. See page E-10 for more information about connecting to a PC running Windows XP. 3. ClassPad Manager will automatically detect and connect to the ClassPad. 4. Once the ClassPad has been named (see "To name a ClassPad" on page E-32) and is displayed in column one of ClassPad Manager, continue connecting the other ClassPads one at a time until all are connected. E-42 20050901
-
 1
1 -
2
-
3
-
4
-
5
-
6
-
7
-
8
-
9
-
10
-
11
-
12
-
13
-
14
-
15
-
16
-
17
-
18
-
19
-
20
-
21
-
22
-
23
-
24
-
25
-
26
-
27
-
28
-
29
-
30
-
31
-
32
-
33
-
34
-
35
-
36
-
37
-
38
-
 39
39 -
 40
40 -
 41
41 -
 42
42 -
 43
43 -
 44
44 -
 45
45 -
 46
46 -
 47
47 -
 48
48 -
 49
49 -
50
-
51
-
52
-
53
-
54
-
55
-
56
-
57
-
58
-
59
 |
 |
