Casio CLASSPad300 User Manual - Page 33
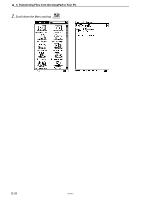
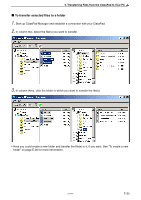
columns one and two, and flash or memory images will appear in columns three and four.
 |
UPC - 079767161071
View all Casio CLASSPad300 manuals
Add to My Manuals
Save this manual to your list of manuals |
Page 33 highlights
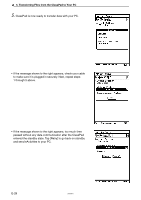
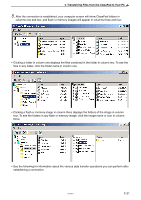
5. Transferring Files from the ClassPad to Your PC 5. After the connection is established, your computer screen will show ClassPad folders in columns one and two, and flash or memory images will appear in columns three and four. • Clicking a folder in column one displays the files contained in the folder in column two. To see the files in any folder, click the folder name in column one. • Clicking a flash or memory image in column three displays the folders of the image in column four. To see the folders in any flash or memory image, click the image name or icon in column three. • See the following for information about the various data transfer operations you can perform after establishing a connection. 20050901 E-31
-
 1
1 -
2
-
3
-
4
-
5
-
6
-
7
-
8
-
9
-
10
-
11
-
12
-
13
-
14
-
15
-
16
-
17
-
18
-
19
-
20
-
21
-
22
-
23
-
24
-
25
-
26
-
27
-
 28
28 -
 29
29 -
 30
30 -
 31
31 -
 32
32 -
 33
33 -
 34
34 -
 35
35 -
 36
36 -
 37
37 -
 38
38 -
39
-
40
-
41
-
42
-
43
-
44
-
45
-
46
-
47
-
48
-
49
-
50
-
51
-
52
-
53
-
54
-
55
-
56
-
57
-
58
-
59
 |
 |

E-31
20050901
5.
Transferring Files from the ClassPad to Your PC
• Clicking a folder in column one displays the files contained in the folder in column two. To see the
files in any folder, click the folder name in column one.
• Clicking a flash or memory image in column three displays the folders of the image in column
four. To see the folders in any flash or memory image, click the image name or icon in column
three.
• See the following for information about the various data transfer operations you can perform after
establishing a connection.
5.
After the connection is established, your computer screen will show ClassPad folders in
columns one and two, and flash or memory images will appear in columns three and four.