Casio EX-Z1200 Owners Manual - Page 119
Align the guidelines that appear on the, monitor screen with the subject in the, recorded image.
 |
UPC - 079767622770
View all Casio EX-Z1200 manuals
Add to My Manuals
Save this manual to your list of manuals |
Page 119 highlights
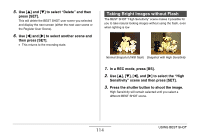
2. Align the guidelines that appear on the monitor screen with the subject in the recorded image. Head Line Oval Boundary Chin Line Align the subject so the head fills the oval boundary. Also make sure that the subject's head is within the head line and the chin line. To do this: Perform this operation: Move the subject up, down, left, Use [S], [T], [W], [X]. and right Enlarge the subject Slide zoom controller towards [ ]. Slide zoom controller Reduce the size of the subject towards [ ]. 3. When everything is the way you want, press [SET]. This saves the image in memory. IMPORTANT! • An ID photo is always saved as 5M (2560 × 1920 pixels), regardless of the camera's current image size setting. C 119 USING BEST SHOT
-
 1
1 -
2
-
3
-
4
-
5
-
6
-
7
-
8
-
9
-
10
-
11
-
12
-
13
-
14
-
15
-
16
-
17
-
18
-
19
-
20
-
21
-
22
-
23
-
24
-
25
-
26
-
27
-
28
-
29
-
30
-
31
-
32
-
33
-
34
-
35
-
36
-
37
-
38
-
39
-
40
-
41
-
42
-
43
-
44
-
45
-
46
-
47
-
48
-
49
-
50
-
51
-
52
-
53
-
54
-
55
-
56
-
57
-
58
-
59
-
60
-
61
-
62
-
63
-
64
-
65
-
66
-
67
-
68
-
69
-
70
-
71
-
72
-
73
-
74
-
75
-
76
-
77
-
78
-
79
-
80
-
81
-
82
-
83
-
84
-
85
-
86
-
87
-
88
-
89
-
90
-
91
-
92
-
93
-
94
-
95
-
96
-
97
-
98
-
99
-
100
-
101
-
102
-
103
-
104
-
105
-
106
-
107
-
108
-
109
-
110
-
111
-
112
-
113
-
 114
114 -
 115
115 -
 116
116 -
 117
117 -
 118
118 -
 119
119 -
 120
120 -
 121
121 -
 122
122 -
 123
123 -
 124
124 -
125
-
126
-
127
-
128
-
129
-
130
-
131
-
132
-
133
-
134
-
135
-
136
-
137
-
138
-
139
-
140
-
141
-
142
-
143
-
144
-
145
-
146
-
147
-
148
-
149
-
150
-
151
-
152
-
153
-
154
-
155
-
156
-
157
-
158
-
159
-
160
-
161
-
162
-
163
-
164
-
165
-
166
-
167
-
168
-
169
-
170
-
171
-
172
-
173
-
174
-
175
-
176
-
177
-
178
-
179
-
180
-
181
-
182
-
183
-
184
-
185
-
186
-
187
-
188
-
189
-
190
-
191
-
192
-
193
-
194
-
195
-
196
-
197
-
198
-
199
-
200
-
201
-
202
-
203
-
204
-
205
-
206
-
207
-
208
-
209
-
210
-
211
-
212
-
213
-
214
-
215
-
216
-
217
-
218
-
219
-
220
-
221
-
222
-
223
-
224
-
225
-
226
-
227
-
228
-
229
-
230
-
231
-
232
-
233
-
234
-
235
-
236
-
237
-
238
-
239
-
240
-
241
-
242
-
243
-
244
-
245
-
246
-
247
-
248
-
249
-
250
-
251
-
252
-
253
-
254
-
255
-
256
-
257
-
258
-
259
-
260
-
261
-
262
-
263
-
264
-
265
-
266
-
267
-
268
-
269
-
270
-
271
-
272
-
273
-
274
-
275
-
276
-
277
-
278
-
279
-
280
-
281
-
282
-
283
-
284
-
285
-
286
-
287
-
288
-
289
 |
 |

119
USING BEST SHOT
2.
Align the guidelines that appear on the
monitor screen with the subject in the
recorded image.
Align the s
ub
ject so the head fills the o
v
al
b
o
u
ndary. Also
make s
u
re that the s
ub
ject’s head is
w
ithin the head line and
the chin line.
3.
When everything is the way you want, press
[SET].
This sa
v
es the image in memory.
IMPORTANT!
•
An ID photo is al
w
ays sa
v
ed as 5M (2560 × 1920 pixels),
regardless of the camera’s c
u
rrent image size setting.
To do this:
Perform this
operation:
Mo
v
e the s
ub
ject
u
p, do
w
n, left,
and right
Use [
], [
], [
], [
].
Enlarge the s
ub
ject
Slide zoom controller
to
w
ards [
].
Red
u
ce the size of the s
ub
ject
Slide zoom controller
to
w
ards [
].
Head Line
Oval Boundary
Chin Line
C