Casio XJ-560 Owners Manual - Page 18
Displaying the Pointer
 |
View all Casio XJ-560 manuals
Add to My Manuals
Save this manual to your list of manuals |
Page 18 highlights
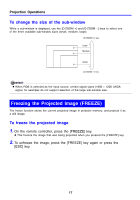
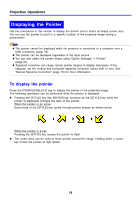
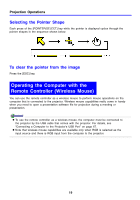
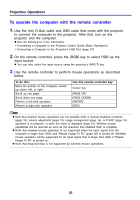
Projection Operations Displaying the Pointer Use the procedures in this section to display the pointer and to select its shape (arrow, bar). You can use the pointer to point to a specific location of the projected image during a presentation. z The pointer cannot be displayed while the projector is connected to a computer over a USB connection (page 75). z The pointer can be displayed regardless of the input source. z You can also select the pointer shape using "Option Settings2 J Pointer" (page 61). z Trapezoid correction can cause certain pointer shapes to display improperly. If this happens, set the vertical and horizontal trapezoid correction values both to zero. See "Manual Keystone Correction" (page 10) for more information. To display the pointer Press the [POINTER/SELECT] key to display the pointer in the projected image. The following operations can be performed while the pointer is displayed. z Pressing the [STYLE] key (the [ENTER] key functions as the [STYLE] key while the pointer is displayed) changes the style of the pointer. When the pointer is an arrow: Each press of the [STYLE] key cycles through pointer shapes as shown below. When the pointer is a bar: Pressing the [STYLE] key causes the pointer to flash. z The cursor keys can be used to move pointer around the image. Holding down a cursor key moves the pointer at high speed. 18
-
 1
1 -
2
-
3
-
4
-
5
-
6
-
7
-
8
-
9
-
10
-
11
-
12
-
 13
13 -
 14
14 -
 15
15 -
 16
16 -
 17
17 -
 18
18 -
 19
19 -
 20
20 -
 21
21 -
 22
22 -
 23
23 -
24
-
25
-
26
-
27
-
28
-
29
-
30
-
31
-
32
-
33
-
34
-
35
-
36
-
37
-
38
-
39
-
40
-
41
-
42
-
43
-
44
-
45
-
46
-
47
-
48
-
49
-
50
-
51
-
52
-
53
-
54
-
55
-
56
-
57
-
58
-
59
-
60
-
61
-
62
-
63
-
64
-
65
-
66
-
67
-
68
-
69
-
70
-
71
-
72
-
73
-
74
-
75
-
76
-
77
-
78
 |
 |
