Casio XJ-560 Owners Manual - Page 21
Using the Setup Menu, Setup Menu Overview
 |
View all Casio XJ-560 manuals
Add to My Manuals
Save this manual to your list of manuals |
Page 21 highlights
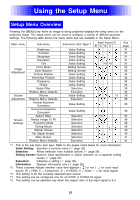
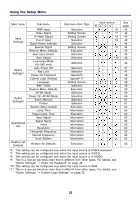
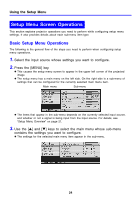
Using the Setup Menu Using the Setup Menu Setup Menu Overview Pressing the [MENU] key while an image is being projected displays the setup menu on the projected image. The setup menu can be used to configure a variety of different projector settings. The following table shows the menu items that are available in the Setup Menu. Main menu Sub-menu Brightness Sub-menu Item Type*1 Value Setting Input source*2 RCSV - See page 31 Image Adjustment Contrast Sharpness Saturation Tint Color Mode Color Balance Vertical Position Value Setting Value Setting Value Setting Value Setting Setting Screen Setting Screen Value Setting 31 31 31 *4 *4 31 32 32 34 Horizontal Position Value Setting 34 Frequency Value Setting 34 Phase Value Setting 34 Volume Adjustment Noise Filter Restore Menu Defaults Volume Restore Menu Defaults Vertical Keystone Correction Horizontal Keystone Correction Aspect Ratio Selection Execution Value Setting Execution Value Setting Value Setting Selection 35 35 *3 35 35 36 36 *5 37 Screen Resize Image To Fit Selection 38 Settings Projection Mode Selection 39 Ceiling Mount Selection 39 Startup Screen Selection 40 No Signal Screen Selection 40 Mute Screen Selection 41 Restore Menu Defaults Execution 41 *1 This is the sub-menu item type. Refer to the pages noted below for more information. Value Setting: Specifies a numeric value () page 26). Selection: Allows selection from multiple options () page 26). Setting Screen: Numeric value specification or option selection on a separate setting screen () page 27). Execution: Initializes a setting () page 28). Information: Displays information only () page 28). *2 These columns indicate whether each item appears ( ) or not ( ) for each input source (R = RGB, C = Component, S = S-VIDEO, V = Video, - = No input signal). *3 This setting is for the currently selected input source. *4 This setting can be configured only for an NTSC or NTSC4.43 signal. *5 This setting can be selected only when the aspect ratio of the input signal is 4:3. 21
-
 1
1 -
2
-
3
-
4
-
5
-
6
-
7
-
8
-
9
-
10
-
11
-
12
-
13
-
14
-
15
-
 16
16 -
 17
17 -
 18
18 -
 19
19 -
 20
20 -
 21
21 -
 22
22 -
 23
23 -
 24
24 -
 25
25 -
 26
26 -
27
-
28
-
29
-
30
-
31
-
32
-
33
-
34
-
35
-
36
-
37
-
38
-
39
-
40
-
41
-
42
-
43
-
44
-
45
-
46
-
47
-
48
-
49
-
50
-
51
-
52
-
53
-
54
-
55
-
56
-
57
-
58
-
59
-
60
-
61
-
62
-
63
-
64
-
65
-
66
-
67
-
68
-
69
-
70
-
71
-
72
-
73
-
74
-
75
-
76
-
77
-
78
 |
 |
