Casio XJ-560 Owners Manual - Page 22
Casio XJ-560 - XGA DLP Projector Manual
 |
View all Casio XJ-560 manuals
Add to My Manuals
Save this manual to your list of manuals |
Page 22 highlights
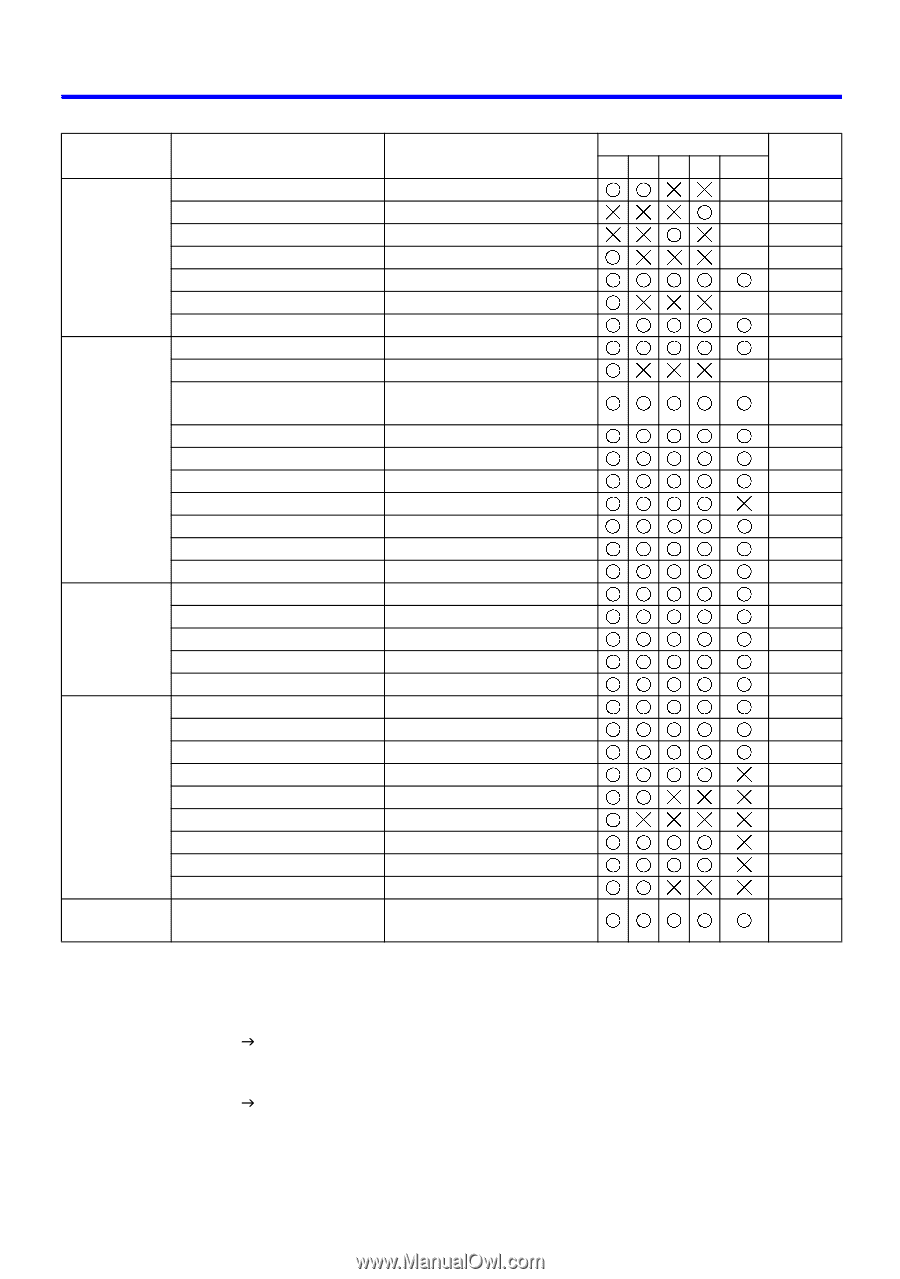
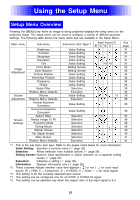
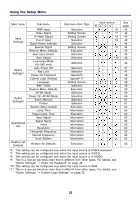
Using the Setup Menu Main menu Input Settings Option Settings1 Option Settings2 Operational Info Restore All Defaults Sub-menu RGB Input Video Signal S-Video Signal P-in-P Input Signal Name Indicator Special Signal Restore Menu Defaults Auto Input Detect Auto Adjust Low-noise Mode (XJ-560 only) Auto Power Off Key Lock Power On Password Custom Logo Settings Language Alert Tones Restore Menu Defaults AF/AK Mode Power On AF/AK Mode Zoom Memory Pointer Restore Menu Default Lamp Time Reset Lamp Time Input Signal Signal Name Index Resolution Horizontal Frequency Vertical Frequency Scan System Restore All Defaults Sub-menu Item Type Selection Setting Screen Setting Screen Selection Selection Setting Screen Execution Selection Selection Selection Selection Selection Special*9 Special*11 Setting Screen Selection Execution Selection Selection Selection Selection Execution Information Execution Information Information Information Information Information Information Information Execution Input source RCSV - *6 *7 *8 *9 *9 *10 *6 This setting can be configured only when the input source is RGB/Component. *7 This setting can be configured only when the input source is VIDEO. *8 This setting can be configured only when the input source is S-VIDEO. *9 This is a special sub-menu item that is different from other types. For details, see "Option Settings1 J Power On Password" on page 48. *10 This setting can be configured only when the input source is RGB. *11 This is a special sub-menu item that is different from other types. For details, see "Option Settings1 J Custom Logo Settings" on page 52. See page 42 42 42 43 44 44 45 45 46 46 47 47 48 52 58 58 59 59 60 61 61 62 62 62 62 62 62 62 62 62 63 63 22
-
 1
1 -
2
-
3
-
4
-
5
-
6
-
7
-
8
-
9
-
10
-
11
-
12
-
13
-
14
-
15
-
16
-
 17
17 -
 18
18 -
 19
19 -
 20
20 -
 21
21 -
 22
22 -
 23
23 -
 24
24 -
 25
25 -
 26
26 -
 27
27 -
28
-
29
-
30
-
31
-
32
-
33
-
34
-
35
-
36
-
37
-
38
-
39
-
40
-
41
-
42
-
43
-
44
-
45
-
46
-
47
-
48
-
49
-
50
-
51
-
52
-
53
-
54
-
55
-
56
-
57
-
58
-
59
-
60
-
61
-
62
-
63
-
64
-
65
-
66
-
67
-
68
-
69
-
70
-
71
-
72
-
73
-
74
-
75
-
76
-
77
-
78
 |
 |