Cisco 1230AG Configuration Guide - Page 28
DHCP Information, Primary DHCP, Server, ap-manager, Apply, Monitor
 |
View all Cisco 1230AG manuals
Add to My Manuals
Save this manual to your list of manuals |
Page 28 highlights
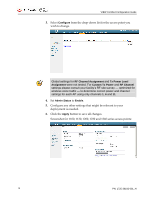
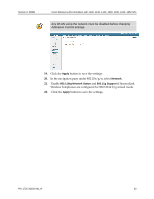
VIEW Certified Configuration Guide 4. Under DHCP Information, enter the IP address of the Primary DHCP Server. 5. Repeat this step for the ap-manager interface. 6. Click the Apply button and save the changes. AP Configuration All handsets operating on a given AP radio must have the same QoS setting. All APs supporting the handsets must be configured to enable the corresponding features. 1. Power-on and connect the APs to the network. Wait a few minutes for the APs to find the controller. 2. Verify the APs are associated to the WLC. 3. From the main menu, click Monitor. 28 PN: 1725-36192-001_H
-
 1
1 -
2
-
3
-
4
-
5
-
6
-
7
-
8
-
9
-
10
-
11
-
12
-
13
-
14
-
15
-
16
-
17
-
18
-
19
-
20
-
21
-
22
-
 23
23 -
 24
24 -
 25
25 -
 26
26 -
 27
27 -
 28
28 -
 29
29 -
 30
30 -
 31
31 -
 32
32 -
 33
33 -
34
-
35
-
36
-
37
-
38
-
39
-
40
 |
 |

VIEW Certified Configuration Guide
PN: 1725-36192-001_H
28
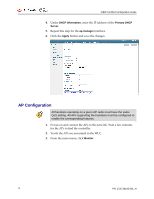
4.
Under
DHCP Information
, enter the IP address of the
Primary DHCP
Server
.
5.
Repeat this step for the
ap-manager
interface.
6.
Click the
Apply
button and save the changes.
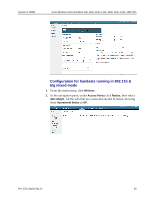
AP Configuration
All handsets operating on a given AP radio must have the same
QoS setting. All APs supporting the handsets must be configured to
enable the corresponding features.
1.
Power-on and connect the APs to the network. Wait a few minutes
for the APs to find the controller.
2.
Verify the APs are associated to the WLC.
3.
From the main menu, click
Monitor
.