Cisco 1230AG Configuration Guide - Page 37
a/n, Voice, Admission, Control, Apply, Network, 11a Network Status, Enabled, Platinum, Quality
 |
View all Cisco 1230AG manuals
Add to My Manuals
Save this manual to your list of manuals |
Page 37 highlights
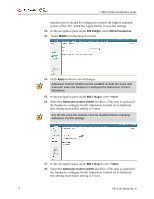
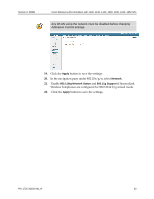
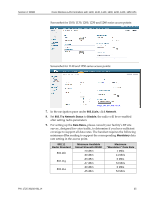
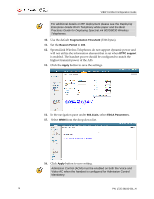
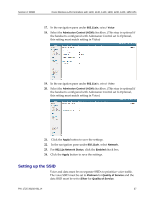
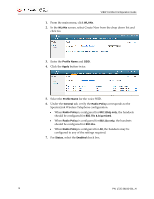
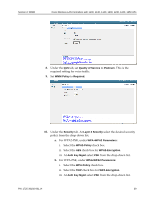
Section 2: WMM Cisco Wireless LAN Controllers with 1100, 1130, 1140, 1200, 1230, 1240, 1250 APs 17. In the navigation pane under 802.11a/n, select Voice 18. Select the Admission Control (ACM) checkbox. (This step is optional if the handset is configured with Admission Control set to Optional, this setting must match setting in Video) 19. In the navigation pane under 802.11a/n, select Video 20. Select the Admission Control (ACM) checkbox. (This step is optional if the handset is configured with Admission Control set to Optional, this setting must match setting in Voice) 21. Click the Apply button to save the settings. 22. In the navigation pane under 802.11a/n, select Network. 23. For 802.11a Network Status, click the Enabled check box. 24. Click the Apply button to save the settings. Setting up the SSID Voice and data must be on separate SSIDs to prioritize voice traffic. The voice SSID must be set to Platinum for Quality of Service and the data SSID must be set to Silver for Quality of Service. PN: 1725-36192-001_H 37
-
 1
1 -
2
-
3
-
4
-
5
-
6
-
7
-
8
-
9
-
10
-
11
-
12
-
13
-
14
-
15
-
16
-
17
-
18
-
19
-
20
-
21
-
22
-
23
-
24
-
25
-
26
-
27
-
28
-
29
-
30
-
31
-
 32
32 -
 33
33 -
 34
34 -
 35
35 -
 36
36 -
 37
37 -
 38
38 -
 39
39 -
 40
40
 |
 |
