Cisco ASR1000-RP2 Software Guide - Page 69
Command or Action, Purpose, issu runversion, show platform
 |
View all Cisco ASR1000-RP2 manuals
Add to My Manuals
Save this manual to your list of manuals |
Page 69 highlights
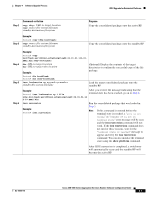
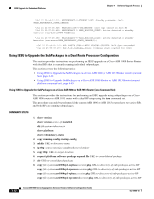
Chapter 4 Software Upgrade Process ISSU Upgrade for Redundant Platforms Step 2 Command or Action copy tftp: URL-to-target-location copy source-file-system:filename standby-destination-filesystem Purpose Copy the consolidated package onto the active RP. Step 3 Example: Router# copy tftp bootflash: copy source-file-system:filename standby-destination-filesystem Copy the consolidated package onto the standby RP. Step 4 Step 5 Step 6 Example: Router# copy bootflash:asr1000rp1-adventerprisek9.02.01.01.122-33. XNA1.bin stby-bootflash: dir URL-to-target-location dir URL-to-target-stby-location Example: (Optional) Display the contents of the target directories to confirm the successful copy of the file package. Router# dir bootflash: Router# dir stby-bootflash: issu loadversion rp upgrade-rp-number standby-file-system:filename Load the target consolidated package onto the standby RP. Example: Router# issu loadversion rp 1 file stby-bootflash:asr1000rp1-adventerprisek9.02.01.01.12 2-33.XNA1.bin After you receive the message indicating that the terminal state has been reached, go on to Step 6. issu runversion Example: Router# issu runversion Run the consolidated package that was loaded in Step 5. Note If this command is entered before the terminal state is reached, a "peer is not online" or "Standby RP is not in terminal state" error message will be seen and the issu runversion command will not work. If the issu runversion command does not run for these reasons, wait for the "terminal state is reached" message to appear and retry the issu runversion command. You can also monitor the terminal state using the show platform command. After ISSU runversion is completed, a switchover will automatically occur and the standby RP will become the active RP. OL-16506-10 Cisco ASR 1000 Series Aggregation Services Routers Software Configuration Guide 4-7
-
 1
1 -
2
-
3
-
4
-
5
-
6
-
7
-
8
-
9
-
10
-
11
-
12
-
13
-
14
-
15
-
16
-
17
-
18
-
19
-
20
-
21
-
22
-
23
-
24
-
25
-
26
-
27
-
28
-
29
-
30
-
31
-
32
-
33
-
34
-
35
-
36
-
37
-
38
-
39
-
40
-
41
-
42
-
43
-
44
-
45
-
46
-
47
-
48
-
49
-
50
-
51
-
52
-
53
-
54
-
55
-
56
-
57
-
58
-
59
-
60
-
61
-
62
-
63
-
 64
64 -
 65
65 -
 66
66 -
 67
67 -
 68
68 -
 69
69 -
 70
70 -
 71
71 -
 72
72 -
 73
73 -
 74
74 -
75
-
76
-
77
-
78
-
79
-
80
-
81
-
82
-
83
-
84
-
85
-
86
-
87
-
88
-
89
-
90
-
91
-
92
-
93
-
94
-
95
-
96
-
97
-
98
-
99
-
100
-
101
-
102
-
103
-
104
-
105
-
106
-
107
-
108
-
109
-
110
-
111
-
112
-
113
-
114
-
115
-
116
-
117
-
118
-
119
-
120
-
121
-
122
-
123
-
124
-
125
-
126
-
127
-
128
-
129
-
130
-
131
-
132
-
133
-
134
-
135
-
136
-
137
-
138
-
139
-
140
-
141
-
142
-
143
-
144
-
145
-
146
-
147
-
148
-
149
-
150
-
151
-
152
-
153
-
154
-
155
-
156
-
157
-
158
-
159
-
160
-
161
-
162
-
163
-
164
-
165
-
166
-
167
-
168
-
169
-
170
-
171
-
172
-
173
-
174
-
175
-
176
-
177
-
178
-
179
-
180
-
181
-
182
-
183
-
184
-
185
-
186
-
187
-
188
-
189
-
190
-
191
-
192
-
193
-
194
-
195
-
196
-
197
-
198
-
199
-
200
-
201
-
202
-
203
-
204
-
205
-
206
-
207
-
208
-
209
-
210
-
211
-
212
-
213
-
214
-
215
-
216
-
217
-
218
-
219
-
220
-
221
-
222
-
223
-
224
-
225
-
226
-
227
-
228
-
229
-
230
-
231
-
232
-
233
-
234
-
235
-
236
-
237
-
238
-
239
-
240
-
241
-
242
-
243
-
244
-
245
-
246
-
247
-
248
-
249
-
250
-
251
-
252
-
253
-
254
-
255
-
256
-
257
-
258
-
259
-
260
-
261
-
262
-
263
-
264
-
265
-
266
-
267
-
268
-
269
-
270
-
271
-
272
-
273
-
274
-
275
-
276
-
277
-
278
-
279
-
280
-
281
-
282
-
283
-
284
-
285
-
286
-
287
-
288
-
289
-
290
-
291
-
292
-
293
-
294
-
295
-
296
-
297
-
298
-
299
-
300
-
301
-
302
-
303
-
304
-
305
-
306
-
307
-
308
-
309
-
310
-
311
-
312
-
313
-
314
-
315
-
316
-
317
-
318
-
319
-
320
-
321
-
322
-
323
-
324
-
325
-
326
-
327
-
328
-
329
-
330
-
331
-
332
-
333
-
334
-
335
-
336
-
337
-
338
-
339
-
340
-
341
-
342
-
343
-
344
-
345
-
346
-
347
-
348
-
349
-
350
-
351
-
352
-
353
-
354
-
355
-
356
-
357
-
358
-
359
-
360
-
361
-
362
-
363
-
364
-
365
-
366
-
367
-
368
-
369
-
370
-
371
-
372
-
373
-
374
-
375
-
376
-
377
-
378
 |
 |
