Cisco RV016 Administration Guide - Page 85
Enabling Device Discovery with Bonjour, Send SNMP Trap to For IPv4
 |
UPC - 745883556717
View all Cisco RV016 manuals
Add to My Manuals
Save this manual to your list of manuals |
Page 85 highlights
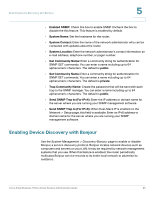
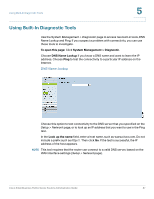
Enabling Device Discovery with Bonjour 5 • Enabled SNMP: Check this box to enable SNMP. Uncheck the box to disable the this feature. This feature is enabled by default. • System Name: Set the hostname for the router. • System Contact: Enter the name of the network administrator who can be contacted with updates about the router. • System Location: Enter the network administrator's contact information: an e-mail address, telephone number, or pager number. • Get Community Name: Enter a community string for authentication for SNMP GET commands. You can enter a name including up to 64 alphanumeric characters. The default is public. • Set Community Name: Enter a community string for authentication for SNMP SET commands. You can enter a name including up to 64 alphanumeric characters. The default is private. • Trap Community Name: Create the password that will be sent with each trap to the SNMP manager. You can enter a name including up to 64 alphanumeric characters. The default is public. • Send SNMP Trap to (For IPv4): Enter the IP address or domain name for the server where you are running your SNMP management software. • Send SNMP Trap to (For IPv6): When Dual-Stack IP is enabled on the Network > Setup page, this field is available. Enter an IPv6 address or domain name for the server where you are running your SNMP management software. Enabling Device Discovery with Bonjour Use the System Management > Discovery-Bonjour page to enable or disable Bonjour, a service discovery protocol. Bonjour locates network devices such as computers and servers on your LAN. It may be required by network management systems that you use. When this feature is enabled, the router periodically multicasts Bonjour service records to its entire local network to advertise its existence. Cisco Small Business RV0xx Series Routers Administration Guide 85
-
 1
1 -
2
-
3
-
4
-
5
-
6
-
7
-
8
-
9
-
10
-
11
-
12
-
13
-
14
-
15
-
16
-
17
-
18
-
19
-
20
-
21
-
22
-
23
-
24
-
25
-
26
-
27
-
28
-
29
-
30
-
31
-
32
-
33
-
34
-
35
-
36
-
37
-
38
-
39
-
40
-
41
-
42
-
43
-
44
-
45
-
46
-
47
-
48
-
49
-
50
-
51
-
52
-
53
-
54
-
55
-
56
-
57
-
58
-
59
-
60
-
61
-
62
-
63
-
64
-
65
-
66
-
67
-
68
-
69
-
70
-
71
-
72
-
73
-
74
-
75
-
76
-
77
-
78
-
79
-
 80
80 -
 81
81 -
 82
82 -
 83
83 -
 84
84 -
 85
85 -
 86
86 -
 87
87 -
 88
88 -
 89
89 -
 90
90 -
91
-
92
-
93
-
94
-
95
-
96
-
97
-
98
-
99
-
100
-
101
-
102
-
103
-
104
-
105
-
106
-
107
-
108
-
109
-
110
-
111
-
112
-
113
-
114
-
115
-
116
-
117
-
118
-
119
-
120
-
121
-
122
-
123
-
124
-
125
-
126
-
127
-
128
-
129
-
130
-
131
-
132
-
133
-
134
-
135
-
136
-
137
-
138
-
139
-
140
-
141
-
142
-
143
-
144
-
145
-
146
-
147
-
148
-
149
-
150
-
151
-
152
-
153
-
154
-
155
-
156
-
157
-
158
-
159
-
160
-
161
-
162
-
163
-
164
-
165
-
166
-
167
-
168
-
169
-
170
-
171
-
172
-
173
-
174
-
175
-
176
-
177
-
178
-
179
-
180
-
181
-
182
-
183
-
184
-
185
-
186
-
187
-
188
-
189
-
190
-
191
-
192
-
193
-
194
-
195
-
196
-
197
-
198
-
199
 |
 |