Cisco WAE-674-K9 Hardware Installation Guide - Page 58
show disks details, Replacing a Hard Disk Drive
 |
UPC - 882658200076
View all Cisco WAE-674-K9 manuals
Add to My Manuals
Save this manual to your list of manuals |
Page 58 highlights
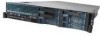
Replacing a Hard Disk Drive Chapter 4 Installing Hardware Options for the WAE-7371, WAE-7341, and WAE-674 Figure 4-9 Replacing a Hard Disk Drive Hard disk drive Tray handle 185094 Step 5 Step 6 Pull the hot-swap drive assembly from the bay. Wait for 1 minute and then insert the new drive into the same slot by aligning the replacement drive assembly with guide rails in the bay and sliding the drive assembly into the bay until it stops. Make sure that the drive is properly seated in the bay. Note Be sure there is no data on the replacement drive. The replacement hard drive should be new or newly-formatted. Step 7 Step 8 Step 9 Close the drive handle. Check the hard disk drive status LED to verify that the hard disk drive is operating correctly. If the amber hard disk drive status LED for a drive is lit continuously, that drive is faulty and must be replaced. If the green hard disk drive activity LED is flashing, the drive is being accessed. Wait 1 minute and then verify that the replaced disk drive is in the Rebuilding state by using the show disks details command in EXEC mode. Note The ServeRAID controller automatically starts the rebuild operation when it detects the removal and reinsertion of a drive that is part of the logical RAID drive. 4-14 Cisco Wide Area Application Engine 7341, 7371, and 674 Hardware Installation Guide OL-15012-02
-
 1
1 -
2
-
3
-
4
-
5
-
6
-
7
-
8
-
9
-
10
-
11
-
12
-
13
-
14
-
15
-
16
-
17
-
18
-
19
-
20
-
21
-
22
-
23
-
24
-
25
-
26
-
27
-
28
-
29
-
30
-
31
-
32
-
33
-
34
-
35
-
36
-
37
-
38
-
39
-
40
-
41
-
42
-
43
-
44
-
45
-
46
-
47
-
48
-
49
-
50
-
51
-
52
-
 53
53 -
 54
54 -
 55
55 -
 56
56 -
 57
57 -
 58
58 -
 59
59 -
 60
60 -
 61
61 -
 62
62 -
 63
63 -
64
-
65
-
66
-
67
-
68
-
69
-
70
-
71
-
72
-
73
-
74
-
75
-
76
-
77
-
78
-
79
-
80
-
81
-
82
-
83
-
84
-
85
-
86
-
87
-
88
-
89
-
90
-
91
-
92
-
93
-
94
-
95
-
96
-
97
-
98
-
99
-
100
-
101
-
102
-
103
-
104
-
105
-
106
-
107
-
108
-
109
-
110
-
111
-
112
-
113
-
114
-
115
-
116
-
117
-
118
-
119
-
120
-
121
-
122
-
123
-
124
-
125
-
126
-
127
-
128
-
129
-
130
-
131
-
132
-
133
-
134
-
135
-
136
-
137
-
138
-
139
-
140
-
141
-
142
-
143
-
144
-
145
-
146
-
147
-
148
-
149
-
150
-
151
-
152
 |
 |
