Cisco WAP200E User Guide - Page 22
Configuring the Wireless-G Access Point - wap200 setup
 |
UPC - 745883578597
View all Cisco WAP200E manuals
Add to My Manuals
Save this manual to your list of manuals |
Page 22 highlights
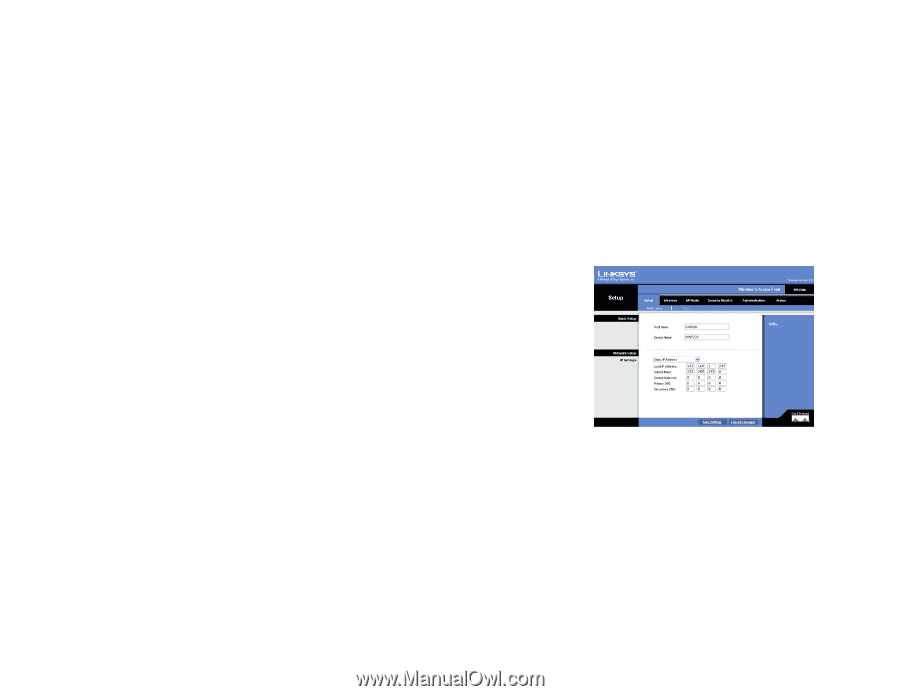
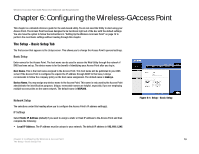
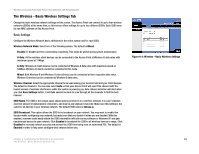
Wireless-G Access Point with Power Over Ethernet and Rangebooster Chapter 6: Configuring the Wireless-G Access Point This chapter is a detailed reference guide for the web-based utility. You do not need the Utility to start using your Access Point. The Access Point has been designed to be functional right out of the box with the default settings. You also have the option to follow the instructions in "Setting Up the Wireless-G Access Point" on page 12 to perform the most basic settings without reading through this chapter. The Setup - Basic Setup Tab The first screen that appears is the Setup screen. This allows you to change the Access Point's general settings. Basic Setup Enter names for the Access Point. The host name can be used to access the Web Utility through the network if DNS has been set up. The device name is for the benefit of identifying your Access Point after you log in. Host Name. This is the host name assigned to the Access Point. This host name will be published to your DNS server if the Access Point is configured to acquire the IP address through DHCP. In that case, Linksys recommends to follow the company policy on the host name assignment. The default name is Linksys. Device Name. You may assign any device name to the Access Point. This name is only used by the Access Point administrator for identification purposes. Unique, memorable names are helpful, especially if you are employing multiple access points on the same network. The default name is WAP200. Network Setup The selections under this heading allow you to configure the Access Point's IP address setting(s). IP Settings Select Static IP Address (default) if you want to assign a static or fixed IP address to the Access Point and then complete the following: • Local IP Address. The IP address must be unique to your network. The default IP address is 192.168.1.245. Figure 6-1: Setup - Basic Setup Chapter 6: Configuring the Wireless-G Access Point 16 The Setup - Basic Setup Tab
-
 1
1 -
2
-
3
-
4
-
5
-
6
-
7
-
8
-
9
-
10
-
11
-
12
-
13
-
14
-
15
-
16
-
 17
17 -
 18
18 -
 19
19 -
 20
20 -
 21
21 -
 22
22 -
 23
23 -
 24
24 -
 25
25 -
 26
26 -
 27
27 -
28
-
29
-
30
-
31
-
32
-
33
-
34
-
35
-
36
-
37
-
38
-
39
-
40
-
41
-
42
-
43
-
44
-
45
-
46
-
47
-
48
-
49
-
50
-
51
-
52
-
53
-
54
-
55
-
56
-
57
-
58
-
59
-
60
-
61
-
62
-
63
-
64
-
65
-
66
-
67
-
68
-
69
-
70
-
71
-
72
-
73
-
74
 |
 |