Cisco WAP200E User Guide - Page 37
The Security Monitor - Basic Settings Tab - default password
 |
UPC - 745883578597
View all Cisco WAP200E manuals
Add to My Manuals
Save this manual to your list of manuals |
Page 37 highlights
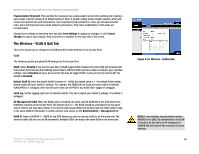
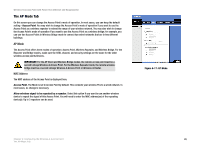
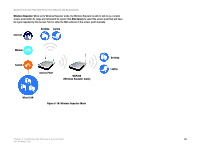
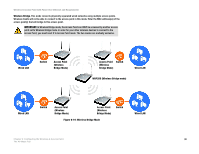
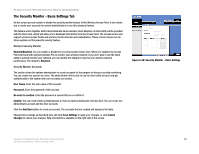
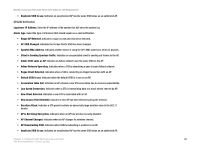
Wireless-G Access Point with Power Over Ethernet and Rangebooster The Security Monitor - Basic Settings Tab On this screen you can enable or disable the security monitor feature of this Wireless Access Point. It also allows you to create user accounts for system administrators to use this advanced feature. This feature works together with Linksys Business Series wireless client adapters. A client utility will be provided with the client card, which will allow you to download information from the Access Point. The current version will support wireless Access Points and wireless clients detection and classification. Please check Linksys.com for future updates on this powerful security feature. Wireless Security Monitor Enabled/Disabled. You can enable or disable the security monitor feature here. When it is enabled, the Access Point will work with selected wireless PCs to monitor your wireless network. If you don't plan to use the client utility to actively monitor your network, you can disable this feature to improve your wireless network performance. The default is Disabled. Security Monitor Accounts The section allows the system administrator to create accounts for the purpose of wireless security monitoring. You can create one account at a time. The administrator will be able to use his client utility to log in and get authenticated to the system after user accounts are created. User Name. Enter the user name of this account. Password. Enter the password of this account. Re-enter to confirm. Enter the password a second time to re-confirm it. Identify. You can create either an Administrator or User account by making the selection here. You can create one Administrator account and five User accounts. Click the Add/Save button to create an account. The accounts that are created will display in the table. Change these settings as described here and click Save Settings to apply your changes, or click Cancel Changes to cancel your changes. Help information is available on the right side of the screen. Figure 6-20: Security Monitor - Basic Settings Chapter 6: Configuring the Wireless-G Access Point 31 The Security Monitor - Basic Settings Tab
-
 1
1 -
2
-
3
-
4
-
5
-
6
-
7
-
8
-
9
-
10
-
11
-
12
-
13
-
14
-
15
-
16
-
17
-
18
-
19
-
20
-
21
-
22
-
23
-
24
-
25
-
26
-
27
-
28
-
29
-
30
-
31
-
 32
32 -
 33
33 -
 34
34 -
 35
35 -
 36
36 -
 37
37 -
 38
38 -
 39
39 -
 40
40 -
 41
41 -
 42
42 -
43
-
44
-
45
-
46
-
47
-
48
-
49
-
50
-
51
-
52
-
53
-
54
-
55
-
56
-
57
-
58
-
59
-
60
-
61
-
62
-
63
-
64
-
65
-
66
-
67
-
68
-
69
-
70
-
71
-
72
-
73
-
74
 |
 |
