Compaq dx7400 Service Reference Guide - HP Compaq dx7400 Business PC - Page 100
Bezel Blanks, 5.25-inch Drive Bezel Blank - small form factor
 |
View all Compaq dx7400 manuals
Add to My Manuals
Save this manual to your list of manuals |
Page 100 highlights
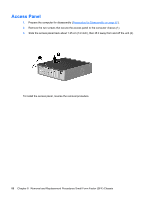
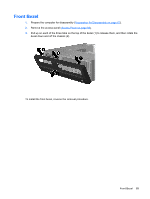
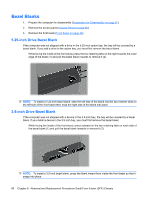
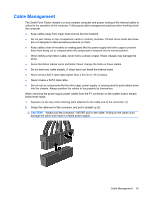
Bezel Blanks 1. Prepare the computer for disassembly (Preparation for Disassembly on page 87). 2. Remove the access panel (Access Panel on page 88). 3. Remove the front bezel (Front Bezel on page 89). 5.25-inch Drive Bezel Blank If the computer was not shipped with a drive in the 5.25-inch option bay, the bay will be covered by a bezel blank. If you add a drive to the option bay, you must first remove the bezel blank. While facing the inside of the front bezel, press the two retaining tabs on the right towards the outer edge of the bezel (1) and pull the bezel blank inwards to remove it (2). NOTE: To install a 5.25-inch bezel blank, slide the left side of the blank into the two retainer slots on the left side of the front bezel then snap the right side of the blank into place. 3.5-inch Drive Bezel Blank If the computer was not shipped with a device in the 3.5-inch bay, the bay will be covered by a bezel blank. If you install a device in the 3.5-inch bay, you must first remove the bezel blank. While facing the inside of the front bezel, press outward on the two retaining tabs on each side of the bezel blank (1) and pull the bezel blank inwards to remove it (2). NOTE: To install a 3.5-inch bezel blank, press the blank inward from inside the front bezel so that it snaps into place. 90 Chapter 8 Removal and Replacement Procedures Small Form Factor (SFF) Chassis
-
 1
1 -
2
-
3
-
4
-
5
-
6
-
7
-
8
-
9
-
10
-
11
-
12
-
13
-
14
-
15
-
16
-
17
-
18
-
19
-
20
-
21
-
22
-
23
-
24
-
25
-
26
-
27
-
28
-
29
-
30
-
31
-
32
-
33
-
34
-
35
-
36
-
37
-
38
-
39
-
40
-
41
-
42
-
43
-
44
-
45
-
46
-
47
-
48
-
49
-
50
-
51
-
52
-
53
-
54
-
55
-
56
-
57
-
58
-
59
-
60
-
61
-
62
-
63
-
64
-
65
-
66
-
67
-
68
-
69
-
70
-
71
-
72
-
73
-
74
-
75
-
76
-
77
-
78
-
79
-
80
-
81
-
82
-
83
-
84
-
85
-
86
-
87
-
88
-
89
-
90
-
91
-
92
-
93
-
94
-
 95
95 -
 96
96 -
 97
97 -
 98
98 -
 99
99 -
 100
100 -
 101
101 -
 102
102 -
 103
103 -
 104
104 -
 105
105 -
106
-
107
-
108
-
109
-
110
-
111
-
112
-
113
-
114
-
115
-
116
-
117
-
118
-
119
-
120
-
121
-
122
-
123
-
124
-
125
-
126
-
127
-
128
-
129
-
130
-
131
-
132
-
133
-
134
-
135
-
136
-
137
-
138
-
139
-
140
-
141
-
142
-
143
-
144
-
145
-
146
-
147
-
148
-
149
-
150
-
151
-
152
-
153
-
154
-
155
-
156
-
157
-
158
-
159
-
160
-
161
-
162
-
163
-
164
-
165
-
166
-
167
-
168
-
169
-
170
-
171
-
172
-
173
-
174
-
175
-
176
-
177
-
178
-
179
-
180
-
181
-
182
-
183
-
184
-
185
-
186
-
187
-
188
-
189
-
190
-
191
-
192
-
193
-
194
-
195
-
196
-
197
-
198
-
199
 |
 |
