Compaq dx7400 Service Reference Guide - HP Compaq dx7400 Business PC - Page 107
Hard Drive, If you are installing a drive in the external 3.5-inch drive bay for the first time
 |
View all Compaq dx7400 manuals
Add to My Manuals
Save this manual to your list of manuals |
Page 107 highlights
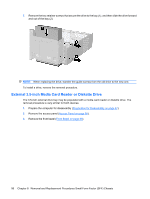
4. Rotate the drive cage to the upright position. 5. If the device is a media card reader, disconnect the internal USB cable from the system board. If the device is a diskette drive, disconnect the power and data cables from the back of the drive. 6. Remove the two retainer screws that secure the drive to the bay (1), and then slide the drive forward and out of the bay (2). To replace the drive, reverse the removal procedure. NOTE: If you are installing a drive in the external 3.5-inch drive bay for the first time, use a flat-blade screwdriver to pry out the metal shield covering the bay. Hard Drive A Torx T-15 screwdriver is needed to remove and install the guide screws on a hard drive. Drives 97
-
 1
1 -
2
-
3
-
4
-
5
-
6
-
7
-
8
-
9
-
10
-
11
-
12
-
13
-
14
-
15
-
16
-
17
-
18
-
19
-
20
-
21
-
22
-
23
-
24
-
25
-
26
-
27
-
28
-
29
-
30
-
31
-
32
-
33
-
34
-
35
-
36
-
37
-
38
-
39
-
40
-
41
-
42
-
43
-
44
-
45
-
46
-
47
-
48
-
49
-
50
-
51
-
52
-
53
-
54
-
55
-
56
-
57
-
58
-
59
-
60
-
61
-
62
-
63
-
64
-
65
-
66
-
67
-
68
-
69
-
70
-
71
-
72
-
73
-
74
-
75
-
76
-
77
-
78
-
79
-
80
-
81
-
82
-
83
-
84
-
85
-
86
-
87
-
88
-
89
-
90
-
91
-
92
-
93
-
94
-
95
-
96
-
97
-
98
-
99
-
100
-
101
-
 102
102 -
 103
103 -
 104
104 -
 105
105 -
 106
106 -
 107
107 -
 108
108 -
 109
109 -
 110
110 -
 111
111 -
 112
112 -
113
-
114
-
115
-
116
-
117
-
118
-
119
-
120
-
121
-
122
-
123
-
124
-
125
-
126
-
127
-
128
-
129
-
130
-
131
-
132
-
133
-
134
-
135
-
136
-
137
-
138
-
139
-
140
-
141
-
142
-
143
-
144
-
145
-
146
-
147
-
148
-
149
-
150
-
151
-
152
-
153
-
154
-
155
-
156
-
157
-
158
-
159
-
160
-
161
-
162
-
163
-
164
-
165
-
166
-
167
-
168
-
169
-
170
-
171
-
172
-
173
-
174
-
175
-
176
-
177
-
178
-
179
-
180
-
181
-
182
-
183
-
184
-
185
-
186
-
187
-
188
-
189
-
190
-
191
-
192
-
193
-
194
-
195
-
196
-
197
-
198
-
199
 |
 |

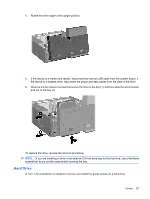
4.
Rotate the drive cage to the upright position.
5.
If the device is a media card reader, disconnect the internal USB cable from the system board. If
the device is a diskette drive, disconnect the power and data cables from the back of the drive.
6.
Remove the two retainer screws that secure the drive to the bay (1), and then slide the drive forward
and out of the bay (2).
To replace the drive, reverse the removal procedure.
NOTE:
If you are installing a drive in the external 3.5-inch drive bay for the first time, use a flat-blade
screwdriver to pry out the metal shield covering the bay.
Hard Drive
A Torx T-15 screwdriver is needed to remove and install the guide screws on a hard drive.
Drives
97