Compaq dx7400 Service Reference Guide - HP Compaq dx7400 Business PC - Page 95
spares kit to secure the cable to the lower right corner of the fan cage. This will prevent the wire bundle
 |
View all Compaq dx7400 manuals
Add to My Manuals
Save this manual to your list of manuals |
Page 95 highlights
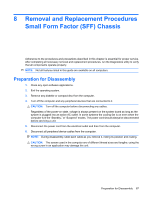
5. Remove the four screws (1) that secure the power supply to the chassis. 6. Slide the power supply toward the front of the computer, then lift it out of the computer. To install the power supply, reverse the removal procedure. NOTE: When attaching the CPU power cable to the system board, use the tie-wrap provided in the spares kit to secure the cable to the lower right corner of the fan cage. This will prevent the wire bundle from interfering with the system fan blades. Power Supply 85
-
 1
1 -
2
-
3
-
4
-
5
-
6
-
7
-
8
-
9
-
10
-
11
-
12
-
13
-
14
-
15
-
16
-
17
-
18
-
19
-
20
-
21
-
22
-
23
-
24
-
25
-
26
-
27
-
28
-
29
-
30
-
31
-
32
-
33
-
34
-
35
-
36
-
37
-
38
-
39
-
40
-
41
-
42
-
43
-
44
-
45
-
46
-
47
-
48
-
49
-
50
-
51
-
52
-
53
-
54
-
55
-
56
-
57
-
58
-
59
-
60
-
61
-
62
-
63
-
64
-
65
-
66
-
67
-
68
-
69
-
70
-
71
-
72
-
73
-
74
-
75
-
76
-
77
-
78
-
79
-
80
-
81
-
82
-
83
-
84
-
85
-
86
-
87
-
88
-
89
-
 90
90 -
 91
91 -
 92
92 -
 93
93 -
 94
94 -
 95
95 -
 96
96 -
 97
97 -
 98
98 -
 99
99 -
 100
100 -
101
-
102
-
103
-
104
-
105
-
106
-
107
-
108
-
109
-
110
-
111
-
112
-
113
-
114
-
115
-
116
-
117
-
118
-
119
-
120
-
121
-
122
-
123
-
124
-
125
-
126
-
127
-
128
-
129
-
130
-
131
-
132
-
133
-
134
-
135
-
136
-
137
-
138
-
139
-
140
-
141
-
142
-
143
-
144
-
145
-
146
-
147
-
148
-
149
-
150
-
151
-
152
-
153
-
154
-
155
-
156
-
157
-
158
-
159
-
160
-
161
-
162
-
163
-
164
-
165
-
166
-
167
-
168
-
169
-
170
-
171
-
172
-
173
-
174
-
175
-
176
-
177
-
178
-
179
-
180
-
181
-
182
-
183
-
184
-
185
-
186
-
187
-
188
-
189
-
190
-
191
-
192
-
193
-
194
-
195
-
196
-
197
-
198
-
199
 |
 |

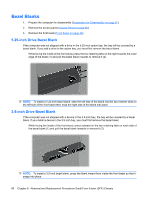
5.
Remove the four screws (1) that secure the power supply to the chassis.
6.
Slide the power supply toward the front of the computer, then lift it out of the computer.
To install the power supply, reverse the removal procedure.
NOTE:
When attaching the CPU power cable to the system board, use the tie-wrap provided in the
spares kit to secure the cable to the lower right corner of the fan cage. This will prevent the wire bundle
from interfering with the system fan blades.
Power Supply
85