Craftsman 536.270320 Owners Manual - Page 20
Adjust, Ati'achment, Clutch
 |
View all Craftsman 536.270320 manuals
Add to My Manuals
Save this manual to your list of manuals |
Page 20 highlights
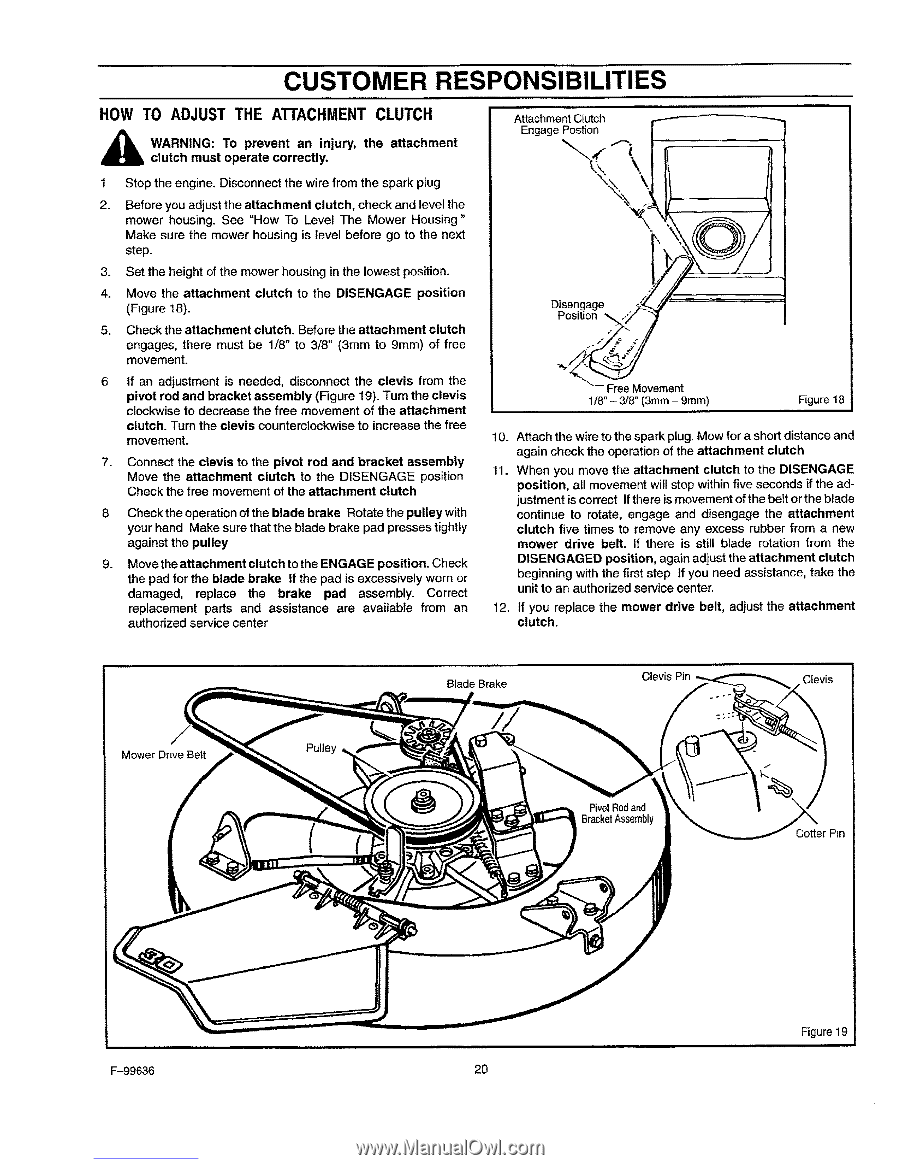
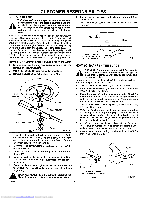
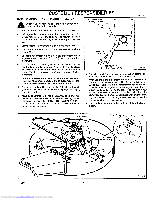
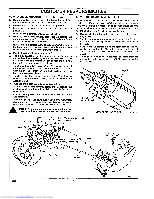
CUSTOMER RESPONSIBILITIES HOW TO ADJUST THE ATI'ACHMENT CLUTCH ,_ WcluAtRchNINmGu:st Toopeprarteevecnotrreacntlyi.njury, the attachment 1 Stop the engine. Disconnect the wire from the spark plug 2. Before you adjust the attachment clutch, check and level the mower housing. See "How To Level The Mower Housing" Make sure the mower housing is level before go to the next step. 3. Set the height of the mower housing in the lowest position. 4. Move the attachment clutch to the DISENGAGE position (Figure 18). 5. Check the attachment clutch. Before the attachment clutch engages, there must be 1/8" to 3/8" (3ram to 9mm) of free movement. 6 If an adjustment is needed, disconnect the clevis from the pivot rod and bracket assembly (Figure 19). Turn the clevis clockwise to decrease the free movement of the attachment clutch. Turn the clevis counterclockwise to increase the free movement. 7. Connect the clevis to the pivot rod and bracket assembly Move the attachment clutch to the DISENGAGE position Check the free movement of the attachment clutch Check the operation of the blade brake Rotate the pulley with your hand Make sure that the blade brake pad presses tightly against the pulley 9. Move the attachment clutch to the ENGAGE position. Check the pad for the blade brake If the pad is excessively worn or damaged, replace the brake pad assembly. Correct replacement parts and assistance are available from an authorized service center AttachmentClutch EngagePostion "x,,.._ p'. % Free Movement 1/8"-3/8" (3mm- 9ram) Figure 18 10. Attach the wire to the spark plug. Mow for a short distance and again check the operation of the attachment clutch 11. When you move the attachment clutch to the DISENGAGE position, all movement will stop within five seconds if the adjustmentis correct If there is movement of the bett orthe blade continue to rotate, engage and disengage the attachment clutch five times to remove any excess rubber from a new mower drive belt. If there is still blade rotation from the DISENGAGED position, again adjust the attachment clutch beginning with the first step tf you need assistance, take the unitto an authorized service center. 12. if you replace the mower drive belt, adjust the attachment clutch. Blade Brake Clevis Pin Mower DrLve Belt PivotRodand BracketAssembly Cotter P_n F-99636 20 Downloaded from www.Manualslib.com manuals search engine Figure 19
-
 1
1 -
2
-
3
-
4
-
5
-
6
-
7
-
8
-
9
-
10
-
11
-
12
-
13
-
14
-
 15
15 -
 16
16 -
 17
17 -
 18
18 -
 19
19 -
 20
20 -
 21
21 -
 22
22 -
 23
23 -
 24
24 -
 25
25 -
26
-
27
-
28
-
29
-
30
-
31
-
32
-
33
-
34
-
35
-
36
-
37
-
38
-
39
-
40
-
41
-
42
-
43
-
44
-
45
-
46
-
47
-
48
-
49
-
50
-
51
-
52
-
53
-
54
-
55
-
56
-
57
-
58
-
59
-
60
 |
 |