Creative 70PF201000009 User Guide - Page 9
Step 4, Transfer Content
 |
UPC - 054651136496
View all Creative 70PF201000009 manuals
Add to My Manuals
Save this manual to your list of manuals |
Page 9 highlights
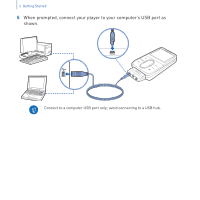
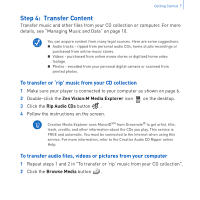
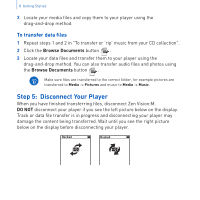
Getting Started 7 Step 4: Transfer Content Transfer music and other files from your CD collection or computer. For more details, see "Managing Music and Data" on page 10. You can acquire content from many legal sources. Here are some suggestions: „ Audio tracks - ripped from personal audio CDs, home studio recordings or purchased from online music stores. „ Videos - purchased from online movie stores or digitized home video footage. „ Photos - encoded from your personal digital camera or scanned from printed photos. To transfer or 'rip' music from your CD collection 1 Make sure your player is connected to your computer as shown on page 6. 2 Double-click the Zen Vision:M Media Explorer icon on the desktop. 3 Click the Rip Audio CDs button . 4 Follow the instructions on the screen. Creative Media Explorer uses MusicIDSM from Gracenote® to get artist, title, track, credits, and other information about the CDs you play. This service is FREE and automatic. You must be connected to the Internet when using this service. For more information, refer to the Creative Audio CD Ripper online Help. To transfer audio files, videos or pictures from your computer 1 Repeat steps 1 and 2 in "To transfer or 'rip' music from your CD collection". 2 Click the Browse Media button .
-
 1
1 -
2
-
3
-
 4
4 -
 5
5 -
 6
6 -
 7
7 -
 8
8 -
 9
9 -
 10
10 -
 11
11 -
 12
12 -
 13
13 -
 14
14 -
15
-
16
-
17
-
18
-
19
-
20
-
21
-
22
-
23
-
24
-
25
-
26
-
27
-
28
-
29
-
30
-
31
-
32
-
33
-
34
-
35
-
36
-
37
-
38
-
39
-
40
-
41
-
42
-
43
-
44
-
45
-
46
-
47
-
48
-
49
-
50
-
51
-
52
-
53
-
54
-
55
-
56
-
57
-
58
-
59
-
60
-
61
-
62
-
63
-
64
-
65
-
66
-
67
-
68
-
69
-
70
-
71
-
72
-
73
-
74
-
75
-
76
-
77
-
78
-
79
-
80
-
81
-
82
-
83
-
84
-
85
-
86
-
87
-
88
-
89
-
90
-
91
-
92
-
93
-
94
-
95
-
96
-
97
-
98
-
99
-
100
-
101
-
102
-
103
-
104
-
105
-
106
-
107
-
108
-
109
-
110
-
111
-
112
-
113
-
114
-
115
-
116
-
117
-
118
-
119
-
120
-
121
-
122
-
123
-
124
-
125
-
126
-
127
-
128
-
129
-
130
-
131
-
132
-
133
-
134
 |
 |