D-Link DES-3010GA Product Manual - Page 38
Starting and Configuring the Device, Read Only, Read/Write, Super, Enable, con lt;Enter> - network router
 |
UPC - 790069280689
View all D-Link DES-3010GA manuals
Add to My Manuals
Save this manual to your list of manuals |
Page 38 highlights
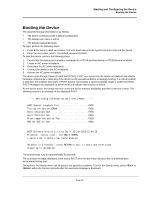
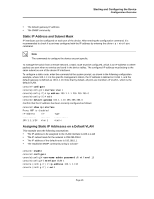
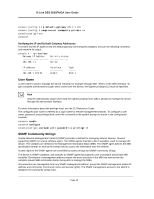
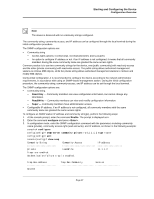
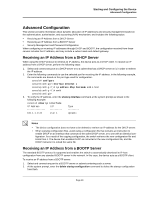
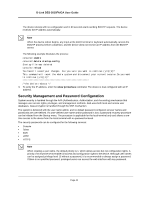
Starting and Configuring the Device Configuration Overview Note The device is delivered with no community strings configured. The community-string, community-access, and IP address can be configured through the local terminal during the initial configuration procedure. The SNMP configuration options are: • Community string - Access rights options: ro (read only), rw (read-and-write), and su (super). - An option to configure IP address or not. If an IP address is not configured, it means that all community members having the same community name are granted the same access rights. Common practice is to use two community strings for the device, one (public community) with read-only access and the other (private community) with read-write access. The public string allows authorized management stations to retrieve MIB objects, while the private string allows authorized management stations to retrieve and modify MIB objects. During initial configuration, it is recommended to configure the device according to the network administrator requirements, in accordance with using an SNMP-based management station. During the initial configuration procedure, the community-string, community-access, and IP address can be set through the local terminal. The SNMP configuration options are: • Community string. - Read Only - Community members can view configuration information, but cannot change any information. - Read/Write - Community members can view and modify configuration information. - Super - Community members have administration access. • Configurable IP address. If an IP address is not configured, all community members with the same community name are granted the same access rights. To configure an SNMP station IP address and community string(s), perform the following steps: 1. At the console prompt, enter the command Enable. The prompt is displayed as #. 2. Enter the command configure and press . 3. In configuration mode, enter the SNMP configuration command with the parameters including community name (private), community access right (read and write), and IP address, as shown in the following example: console# configure config(config)# snmp-server community private rw 11.1.1.2 type router config(config)# exit console(config)# show snmp Community-String Community-Access IP address private readWrite 11.1.1.2 Traps are enabled. Authentication-failure trap is enabled. Trap-Rec-Address System Trap-Rec-Community Version Page 37
-
 1
1 -
2
-
3
-
4
-
5
-
6
-
7
-
8
-
9
-
10
-
11
-
12
-
13
-
14
-
15
-
16
-
17
-
18
-
19
-
20
-
21
-
22
-
23
-
24
-
25
-
26
-
27
-
28
-
29
-
30
-
31
-
32
-
 33
33 -
 34
34 -
 35
35 -
 36
36 -
 37
37 -
 38
38 -
 39
39 -
 40
40 -
 41
41 -
 42
42 -
 43
43 -
44
-
45
-
46
-
47
-
48
-
49
-
50
-
51
-
52
-
53
-
54
-
55
-
56
-
57
-
58
-
59
-
60
-
61
-
62
-
63
-
64
-
65
-
66
-
67
-
68
-
69
-
70
-
71
-
72
-
73
-
74
-
75
-
76
-
77
-
78
-
79
-
80
-
81
-
82
-
83
-
84
-
85
-
86
-
87
-
88
-
89
-
90
-
91
-
92
-
93
-
94
-
95
-
96
-
97
-
98
-
99
-
100
-
101
-
102
-
103
-
104
-
105
-
106
-
107
-
108
-
109
-
110
-
111
-
112
-
113
-
114
-
115
-
116
-
117
-
118
-
119
-
120
-
121
-
122
-
123
-
124
-
125
-
126
-
127
-
128
-
129
-
130
-
131
-
132
-
133
-
134
-
135
-
136
-
137
-
138
-
139
-
140
-
141
-
142
-
143
-
144
-
145
-
146
-
147
-
148
-
149
-
150
-
151
-
152
-
153
-
154
-
155
-
156
-
157
-
158
-
159
-
160
-
161
-
162
-
163
-
164
-
165
-
166
-
167
-
168
-
169
-
170
-
171
-
172
-
173
-
174
-
175
-
176
-
177
-
178
-
179
-
180
-
181
-
182
-
183
-
184
-
185
-
186
-
187
-
188
-
189
-
190
-
191
-
192
-
193
-
194
-
195
-
196
-
197
-
198
-
199
-
200
-
201
-
202
-
203
-
204
-
205
-
206
-
207
-
208
-
209
-
210
-
211
-
212
-
213
-
214
-
215
-
216
-
217
-
218
-
219
-
220
-
221
-
222
-
223
-
224
-
225
-
226
-
227
-
228
-
229
-
230
-
231
-
232
-
233
-
234
-
235
-
236
-
237
-
238
-
239
-
240
-
241
-
242
-
243
-
244
-
245
-
246
-
247
-
248
-
249
-
250
-
251
-
252
-
253
-
254
-
255
-
256
-
257
-
258
-
259
-
260
-
261
-
262
-
263
-
264
-
265
-
266
-
267
-
268
-
269
-
270
-
271
-
272
-
273
-
274
-
275
-
276
-
277
-
278
-
279
-
280
-
281
 |
 |
