D-Link DHP-W306AV Product Manual - Page 16
Hardware Installation - For PowerLine AV Wireless Router, D-Link DHP-W306AV User Manual
 |
UPC - 790069339226
View all D-Link DHP-W306AV manuals
Add to My Manuals
Save this manual to your list of manuals |
Page 16 highlights
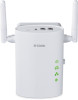
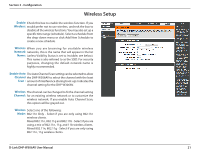
Section 1 - Product Overview Hardware Installation - For PowerLine AV Wireless Router Scenario 1: If you have an existing PowerLine network with a PowerLine AV Wireless Router (e.g. D-Link, DHP-1320) and would like to add a DHPW306AV Extender. Step 1 Plug the DHP-W306AV Extender into a power outlet in a different room of your home away from the PowerLine device . Turn on the DHP-W306AV by pushing the power button located on the side of the unit. Connect one end of the included Ethernet cable to the Ethernet port of the DHP-W306AV Extender and plug the other end of the Ethernet cable to the PC as shown in Figure 2. Step 2 To secure PowerLine network from unauthorized users, press the ENY button on the PowerLine AV Wireless Router for 3 seconds. Then, press the ENY button on the DHP-W306AV Extender for 3 seconds. This must be done within two minutes after pressing the ENY button on the first device. The ENY LED should blink. Both the PowerLine AV adapter and DHP-W306AV will reboot, and all LEDs will turn Off and On. DHP-W306AV Room 2 PowerLine AV Wireless Router (Eg. (DHP-1320) LAN INTERNET RESET USB ON/OFF 1 2 3 AR RT AC IN INTERNET Modem Room 1 Figure 2 Note: Network Connectivity is confirmed when the PowerLine AV LEDs indicators on both PowerLine AV Wireless Router and DHP-W306AV are steadily lit. This will indicate that your network is now secure. Step 3 Open a web browser, enter http://192.168.0.50 (or http://dlinkap) and then press Enter. When the login window appears, set the user name to Admin and leave the password box blank. Click Log In to continue the setup or run the Quick Setup Wizard included in the CD. Please refer to the user manual for more detailed installation information and advanced features. D-Link DHP-W306AV User Manual 16
-
 1
1 -
2
-
3
-
4
-
5
-
6
-
7
-
8
-
9
-
10
-
 11
11 -
 12
12 -
 13
13 -
 14
14 -
 15
15 -
 16
16 -
 17
17 -
 18
18 -
 19
19 -
 20
20 -
 21
21 -
22
-
23
-
24
-
25
-
26
-
27
-
28
-
29
-
30
-
31
-
32
-
33
-
34
-
35
-
36
-
37
-
38
-
39
-
40
-
41
-
42
-
43
-
44
-
45
-
46
-
47
-
48
-
49
-
50
-
51
-
52
-
53
-
54
-
55
-
56
-
57
-
58
-
59
-
60
-
61
-
62
-
63
-
64
-
65
-
66
-
67
-
68
-
69
-
70
-
71
-
72
-
73
-
74
-
75
 |
 |
