D-Link DI-704GU User Manual - Page 42
Port Forwarding
 |
View all D-Link DI-704GU manuals
Add to My Manuals
Save this manual to your list of manuals |
Page 42 highlights
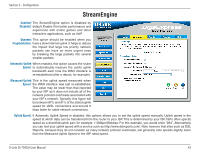
Section 2 - Configuration Port Forwarding Enabled/ Each list entry can be active or inactive, Disabled: according to this selection. Name: Assign a meaningful name to the Application, for example Web Server. Clear: Clicking this button resets all fields to their default values regardless of any edits or whether changes have been saved.� IP Address: Enter the local network IP address of the system hosting the service, for example 192.168.0.50. TCP Ports to Enter the TCP ports to open (for example Open: 6159-6180, 99). UDP Ports to Enter the UDP ports to open (for example Open: 6159-6180, 99). Firewall Rule: Select a firewall rule that controls access as needed for this port forwarding rule. If you do not see the firewall rule you need in the list of firewall rules, go to the Advanced -> Firewall page and create a new firewall rule. Schedule: Select a schedule for the times when this rule is in effect. If you do not see the schedule you need in the list of schedules, go to the Advanced -> Schedules screen and create a new schedule. D-Link DI-704GU User Manual 42
-
 1
1 -
2
-
3
-
4
-
5
-
6
-
7
-
8
-
9
-
10
-
11
-
12
-
13
-
14
-
15
-
16
-
17
-
18
-
19
-
20
-
21
-
22
-
23
-
24
-
25
-
26
-
27
-
28
-
29
-
30
-
31
-
32
-
33
-
34
-
35
-
36
-
 37
37 -
 38
38 -
 39
39 -
 40
40 -
 41
41 -
 42
42 -
 43
43 -
 44
44 -
 45
45 -
 46
46 -
 47
47 -
48
-
49
-
50
-
51
-
52
-
53
-
54
-
55
-
56
-
57
-
58
-
59
-
60
-
61
-
62
-
63
-
64
-
65
-
66
-
67
-
68
-
69
-
70
-
71
-
72
 |
 |
