D-Link DNR-312L User Manual - Page 27
D-Link NVR Search Utility - Windows - software
 |
View all D-Link DNR-312L manuals
Add to My Manuals
Save this manual to your list of manuals |
Page 27 highlights
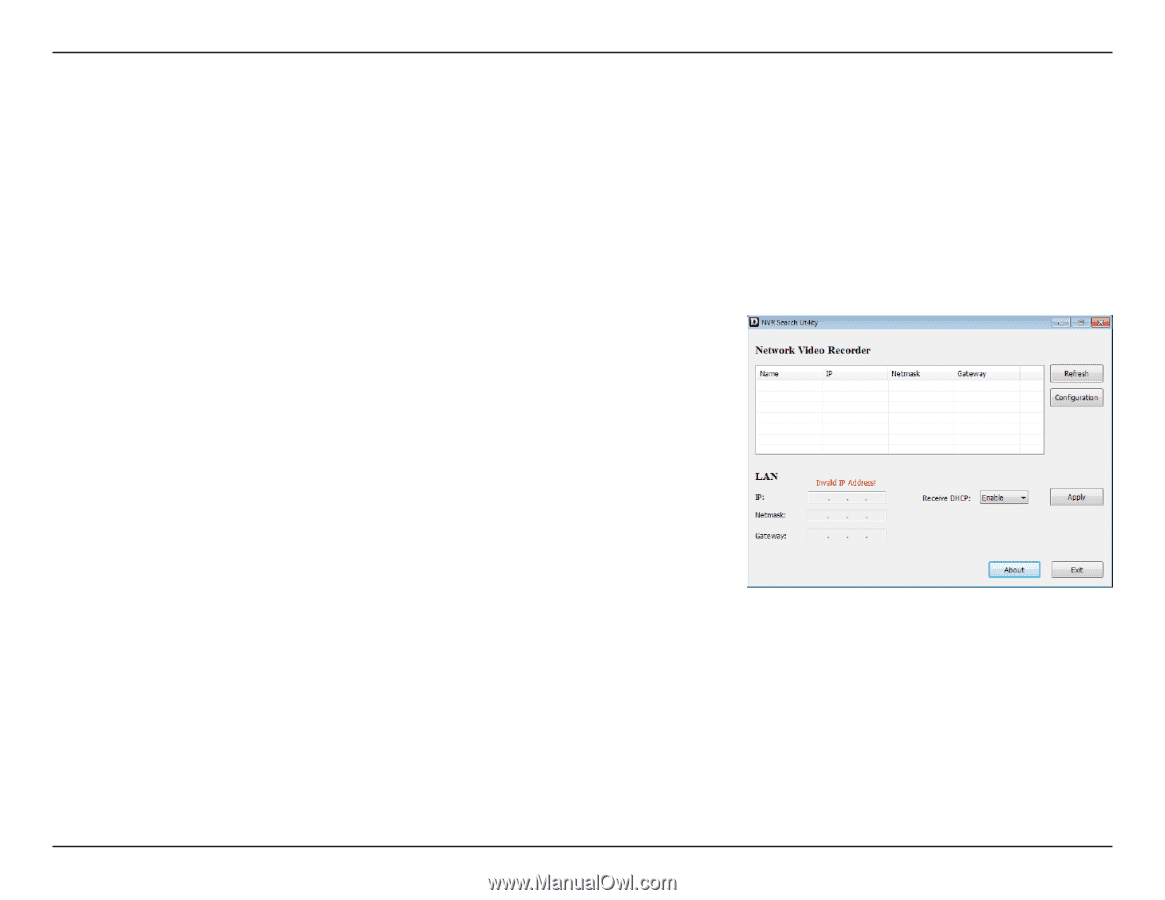
Section 3 - Configuration Interface D-Link NVR Search Utility - Windows Windows Users - Insert the included CD into your CD-ROM drive and click NVR Search Utility to run this setup tool. When first powered on, during the initial boot sequence, the NVR will wait to be assigned an IP address via DHCP (from your router or gateway). If the NVR does not receive a DHCP-assigned IP address, the Auto-IP process will assign a 169.254.xxx.xxx address to the device. If you want to change the IP address before logging in, or are unable to connect to the NVR IP address, use the NVR Search Utility provided on the CD to locate the device on your network and log in to make any necessary changes. Network Video D-Link's NVR Search Utility will display information for all NVR devices Recorder: it detects on your network. Refresh: Click to refresh the device list. Configuration: Click Configuration to access the Web-based configuration interface for the NVR. LAN: Configure the LAN Settings for the NVR. Receive DHCP: Select Enable to use DHCP for your LAN IP settings, or Disable to use Static IP. Apply: Click Apply to save and activate the changes to the LAN Settings. About: Click About to view the software version of the NVR Search Utility. Exit: Click Exit to close the utility. Select a device from the list and click Configuration. This will launch the computer's default web browser and direct it to the IP address listed for the NVR. Make sure the web browser is not configured to use a proxy server. Note: The computer used to access the NVR web-based configuration interface must be on the same subnet as the NVR. If your network is using a DHCP server and the computer receives IP settings from the DHCP server, the NVR will automatically be in the same subnet. D-Link DNR-312L User Manual 23
-
 1
1 -
2
-
3
-
4
-
5
-
6
-
7
-
8
-
9
-
10
-
11
-
12
-
13
-
14
-
15
-
16
-
17
-
18
-
19
-
20
-
21
-
 22
22 -
 23
23 -
 24
24 -
 25
25 -
 26
26 -
 27
27 -
 28
28 -
 29
29 -
 30
30 -
 31
31 -
 32
32 -
33
-
34
-
35
-
36
-
37
-
38
-
39
-
40
-
41
-
42
-
43
-
44
-
45
-
46
-
47
-
48
-
49
-
50
-
51
-
52
-
53
-
54
-
55
-
56
-
57
-
58
-
59
-
60
-
61
-
62
-
63
-
64
-
65
-
66
-
67
-
68
-
69
-
70
-
71
-
72
-
73
-
74
-
75
-
76
-
77
-
78
-
79
-
80
-
81
-
82
-
83
-
84
-
85
-
86
-
87
-
88
-
89
 |
 |