D-Link DSN-1100-10 Hardware Reference Guide for DSN-1100-10 Valid for fir - Page 36
A.3.2 Installing a Hard Drive in a Drive Tray
 |
UPC - 790069321559
View all D-Link DSN-1100-10 manuals
Add to My Manuals
Save this manual to your list of manuals |
Page 36 highlights
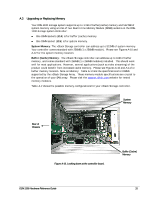
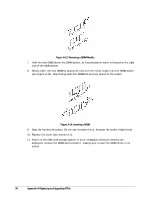
A.3.2 Installing a Hard Drive in a Drive Tray Follow these steps to install a hard drive in a drive tray. 1. If there is one, remove the plastic air dam from the tray by squeezing the two levers together and lifting the piece out of the tray as shown in A-17. Figure A-17 Removing the Plastic Air Dam Piece 2. Your tray should now look like Figure A-18. Figure A-18 Tray with Air Dam Removed 36 Appendix A Replacing and Upgrading FRUs
-
 1
1 -
2
-
3
-
4
-
5
-
6
-
7
-
8
-
9
-
10
-
11
-
12
-
13
-
14
-
15
-
16
-
17
-
18
-
19
-
20
-
21
-
22
-
23
-
24
-
25
-
26
-
27
-
28
-
29
-
30
-
 31
31 -
 32
32 -
 33
33 -
 34
34 -
 35
35 -
 36
36 -
 37
37 -
 38
38 -
 39
39 -
 40
40 -
 41
41 -
42
 |
 |

36
Appendix A Replacing and Upgrading FRUs
A.3.2 Installing a Hard Drive in a Drive Tray
Follow these steps to install a hard drive in a drive tray.
1.
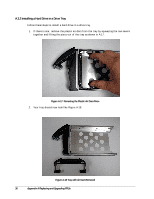
If there is one, remove the plastic air dam from the tray by squeezing the two levers
together and lifting the piece out of the tray as shown in A-17.
Figure A-17
Removing the Plastic Air Dam Piece
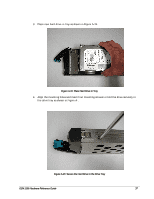
2.
Your tray should now look like Figure A-18.
Figure A-18 Tray with Air Dam Removed