D-Link DWL-3500AP Administration Guide - Page 27
Basic Settings, command prompt, enter - default ip address
 |
UPC - 790069297090
View all D-Link DWL-3500AP manuals
Add to My Manuals
Save this manual to your list of manuals |
Page 27 highlights
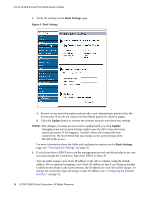
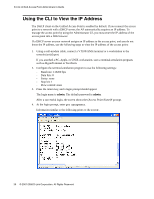
3 Installing the Access Point 2. Connect the power adapter to the power port on the back of the access point, and then plug the other end of the power cord into a power outlet. 3. Use your Web browser to log on to the access point Administration Web pages. If the AP did not acquire an IP address from a DHCP server on your network, enter 10.90.90.91 in the address field of your browser, which is the default IP address of the AP. If you used a DHCP server on your network to automatically configure network information for the AP, enter the new IP address of the AP into the Web browser. If you used a DHCP server and you do not know the new IP address of the AP, use the following procedures to obtain the information: A. Connect a serial cable from the administrative computer to the AP and use a terminal emulation program to access the command-line interface (CLI). B. At the login prompt, enter admin for the user name and admin for the password. At the command prompt, enter: get management The command output displays the IP address of the AP. Enter this address in the address field of your browser. 4. When prompted, enter admin for the user name and admin for the password, then click OK. When you first log in, the Basic Settings page for the Unified Access Point administration is displayed. Installing the Unified Access Point 27
-
 1
1 -
2
-
3
-
4
-
5
-
6
-
7
-
8
-
9
-
10
-
11
-
12
-
13
-
14
-
15
-
16
-
17
-
18
-
19
-
20
-
21
-
 22
22 -
 23
23 -
 24
24 -
 25
25 -
 26
26 -
 27
27 -
 28
28 -
 29
29 -
 30
30 -
 31
31 -
 32
32 -
33
-
34
-
35
-
36
-
37
-
38
-
39
-
40
-
41
-
42
-
43
-
44
-
45
-
46
-
47
-
48
-
49
-
50
-
51
-
52
-
53
-
54
-
55
-
56
-
57
-
58
-
59
-
60
-
61
-
62
-
63
-
64
-
65
-
66
-
67
-
68
-
69
-
70
-
71
-
72
-
73
-
74
-
75
-
76
-
77
-
78
-
79
-
80
-
81
-
82
-
83
-
84
-
85
-
86
-
87
-
88
-
89
-
90
-
91
-
92
-
93
-
94
-
95
-
96
-
97
-
98
-
99
-
100
-
101
-
102
-
103
-
104
-
105
-
106
-
107
-
108
-
109
-
110
-
111
-
112
-
113
-
114
-
115
-
116
-
117
-
118
-
119
-
120
-
121
-
122
-
123
-
124
-
125
-
126
-
127
-
128
-
129
-
130
-
131
-
132
-
133
-
134
-
135
-
136
-
137
-
138
-
139
-
140
-
141
-
142
-
143
-
144
-
145
-
146
-
147
-
148
-
149
-
150
-
151
-
152
-
153
-
154
-
155
-
156
-
157
-
158
-
159
-
160
-
161
-
162
-
163
-
164
-
165
-
166
 |
 |
